Perhaps you are taking your first steps into bird photography or maybe you’ve tried it and had no success. Either way, this article is going to help you with the camera settings you need for great bird shots. I have 8 years of bird photography experience and my photos have been published and sold worldwide in various formats.
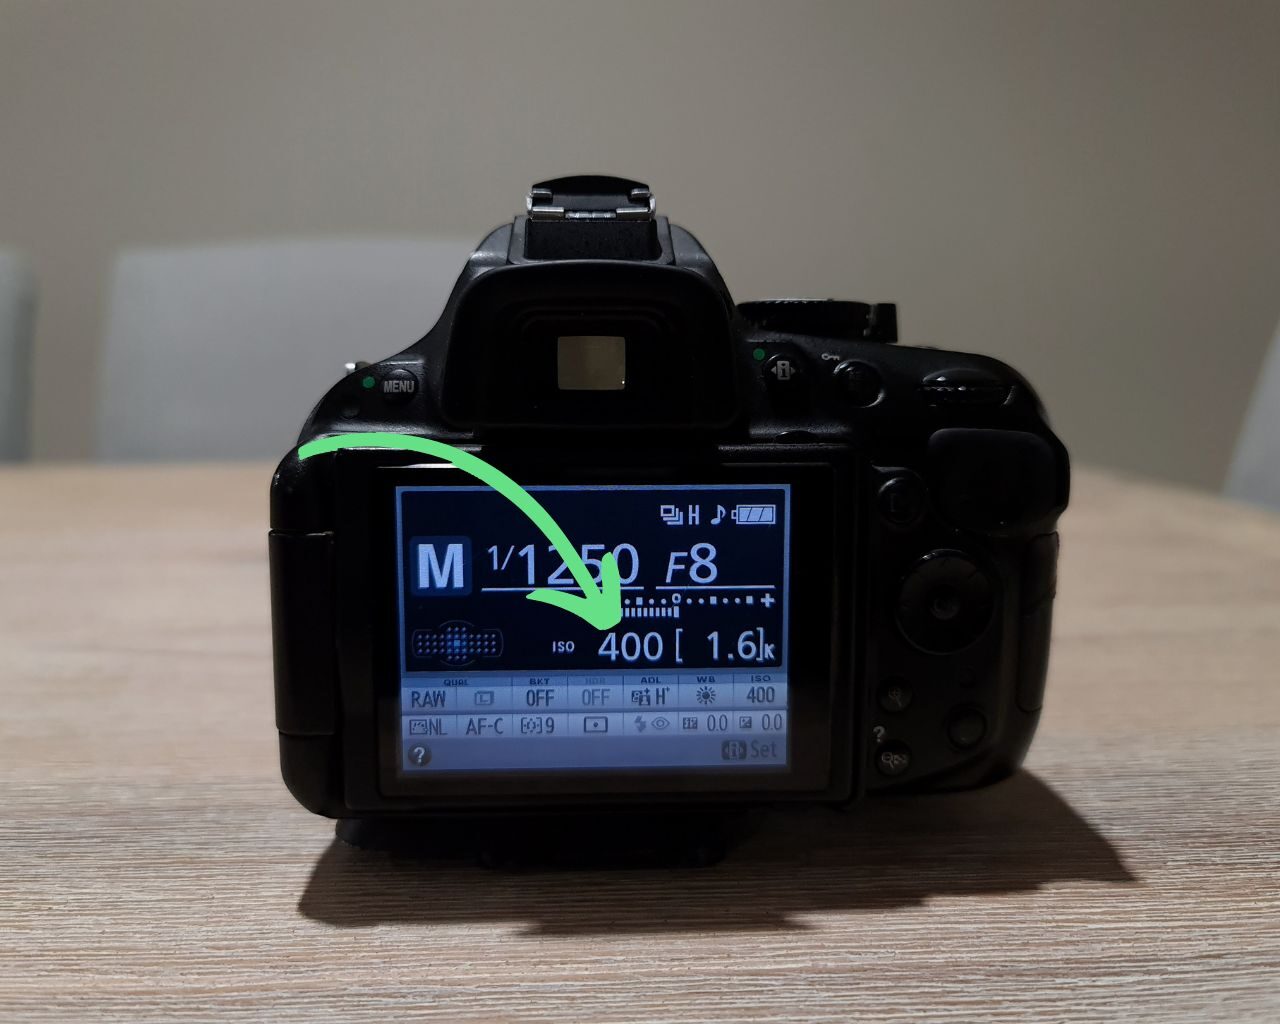
The bird photography settings needed for Nikon DSLR cameras will change subject to the lighting conditions. For example, on a sunny day, you could choose Manual mode, an aperture of f/8.0, shutter speed of 1/1250, and Auto ISO. There are many other settings to consider, this article will cover them.
Many setting combinations will achieve good exposure when shooting birds. You also have to think about focus modes and many other things. In the rest of the article, I will break down each setting and provide you with combinations you can use to get great bird photos.
As an Amazon Associate, I earn from qualifying purchases. Birdwatch World earns commissions from Amazon and similar affiliate programs from any purchases made via links in this article.
Bird Photography Settings For Nikon DSLR Cameras – Initial Setup
Before you even take a shot, there are some camera settings you need to pay attention to. These are in no particular order but all should be checked and set up before you go out shooting.
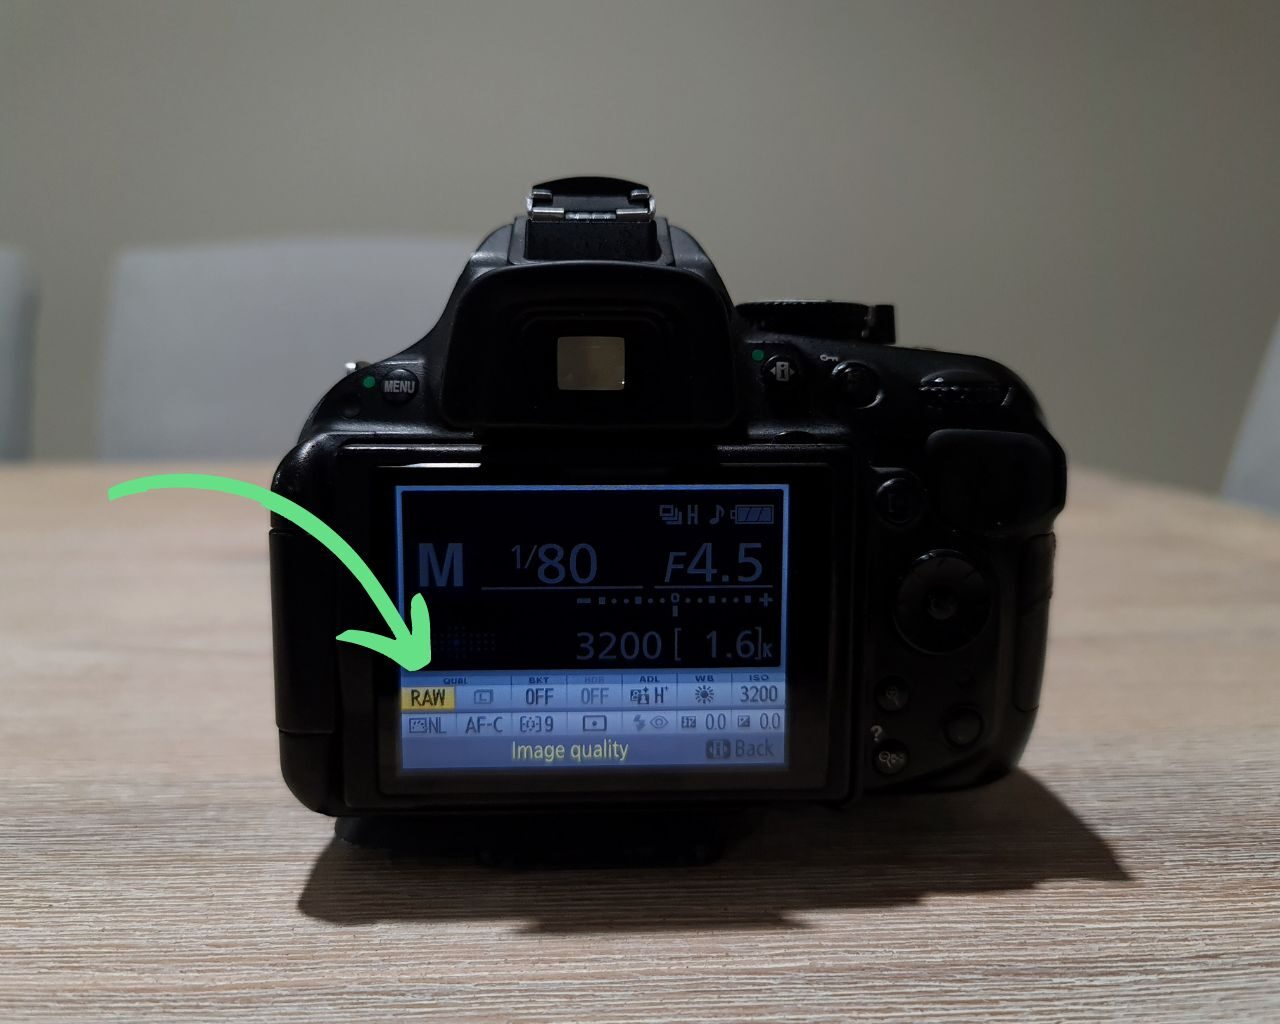
Image Quality
This is where you set the camera to take either RAW or JPEG images or both. What you choose here will decide how relaxed you can be about the other settings in this section.
JPEG files are compressed versions of the image data. Your camera will “throw out” certain information in the file to make the file size smaller. JPEGs are great for saving space on your SD cards and hard drives but are limited when it comes to editing.
RAW files are larger and will take up more space on your SD card and hard drives. The advantage of them is that the camera is capturing all the image data. You have much more scope when editing a RAW file. I’ll explain this more in the following paragraphs.
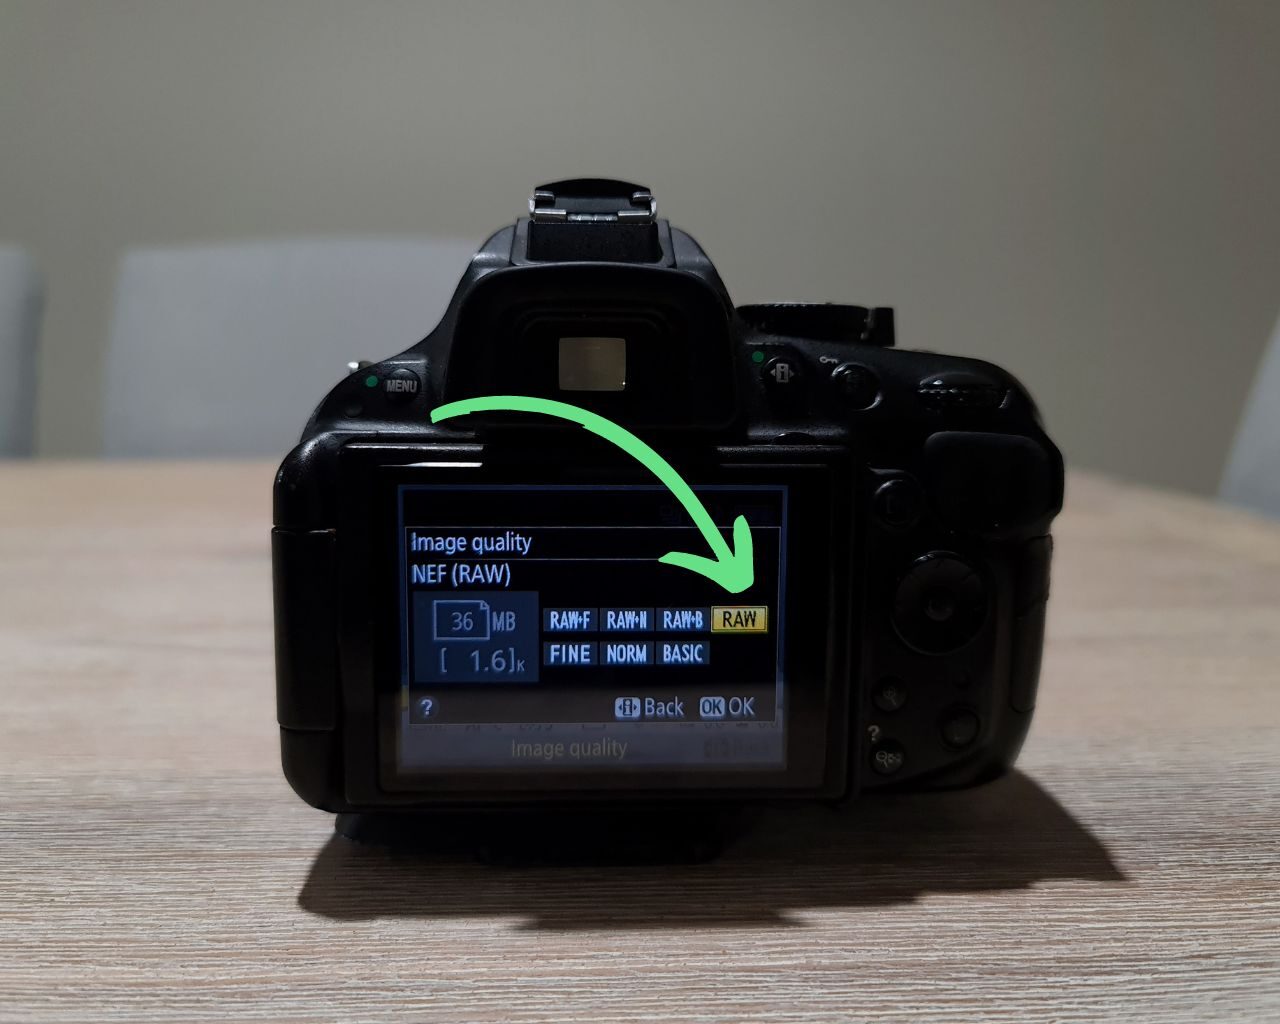
I shoot RAW all the time and I suggest you do the same unless you have no interest in editing your bird photos. If you shoot JPEG, you’ll want to get your settings right every time because you can’t save an under or overexposed image in post-processing.
White Balance
White balance is something that is not normally covered when discussing camera settings for bird photography. However, it is very important.
If you choose RAW in your image quality settings, you don’t have to worry about which white balance setting you use; you can change it afterward in Lightroom or Photoshop.
If you shoot JPEG, you cannot change the white balance in your editing software – you are stuck with whatever it was set on when the shot was taken.
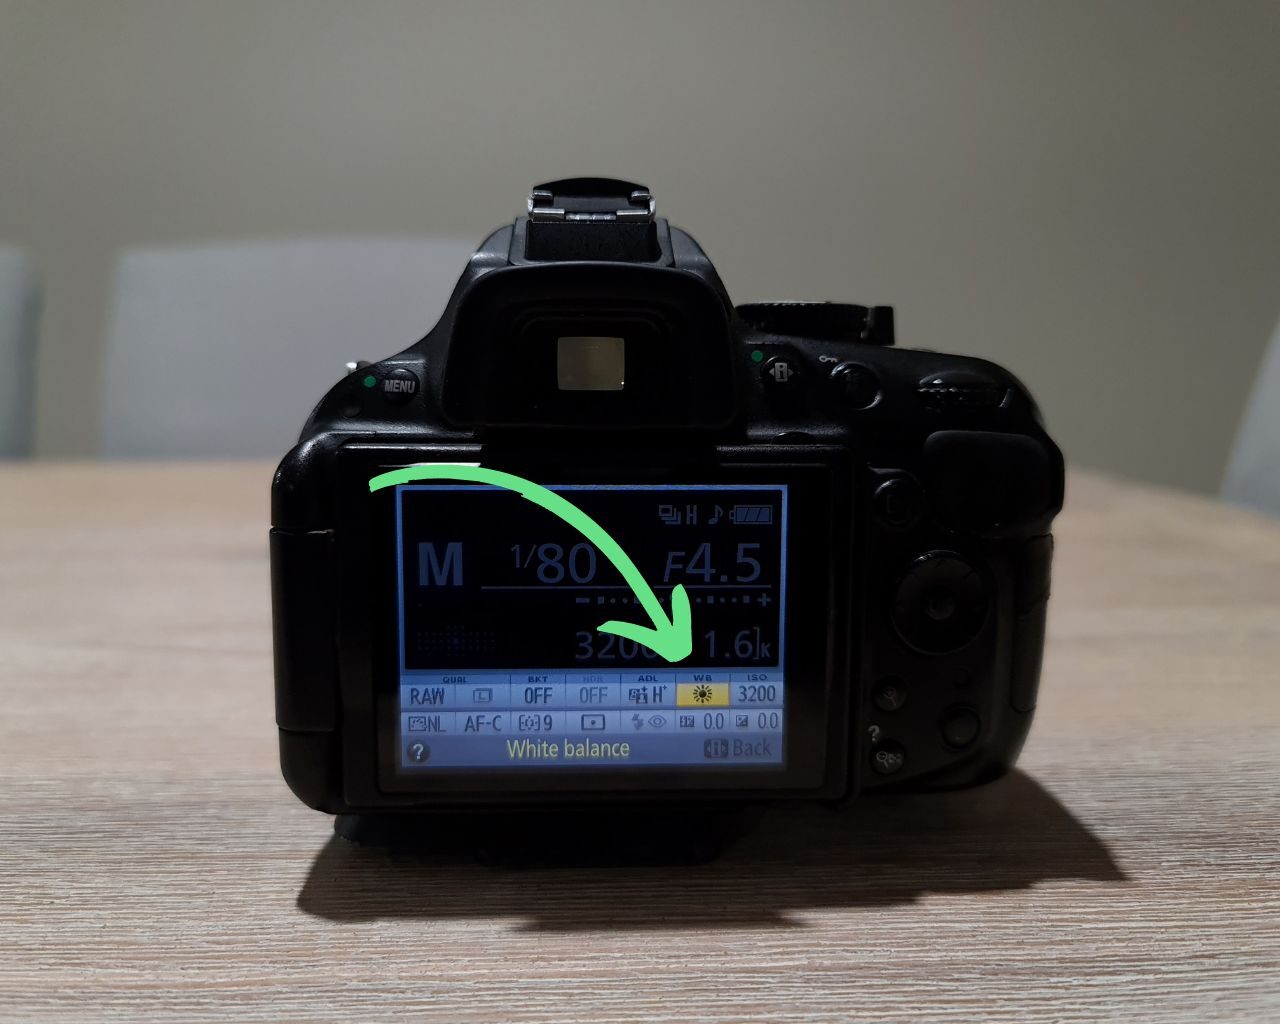
I leave my white balance set to daylight all the time and just change it in Lightroom or Photoshop later if I need to. As you will mostly be outdoors when shooting birds, daylight is the obvious choice anyhow.
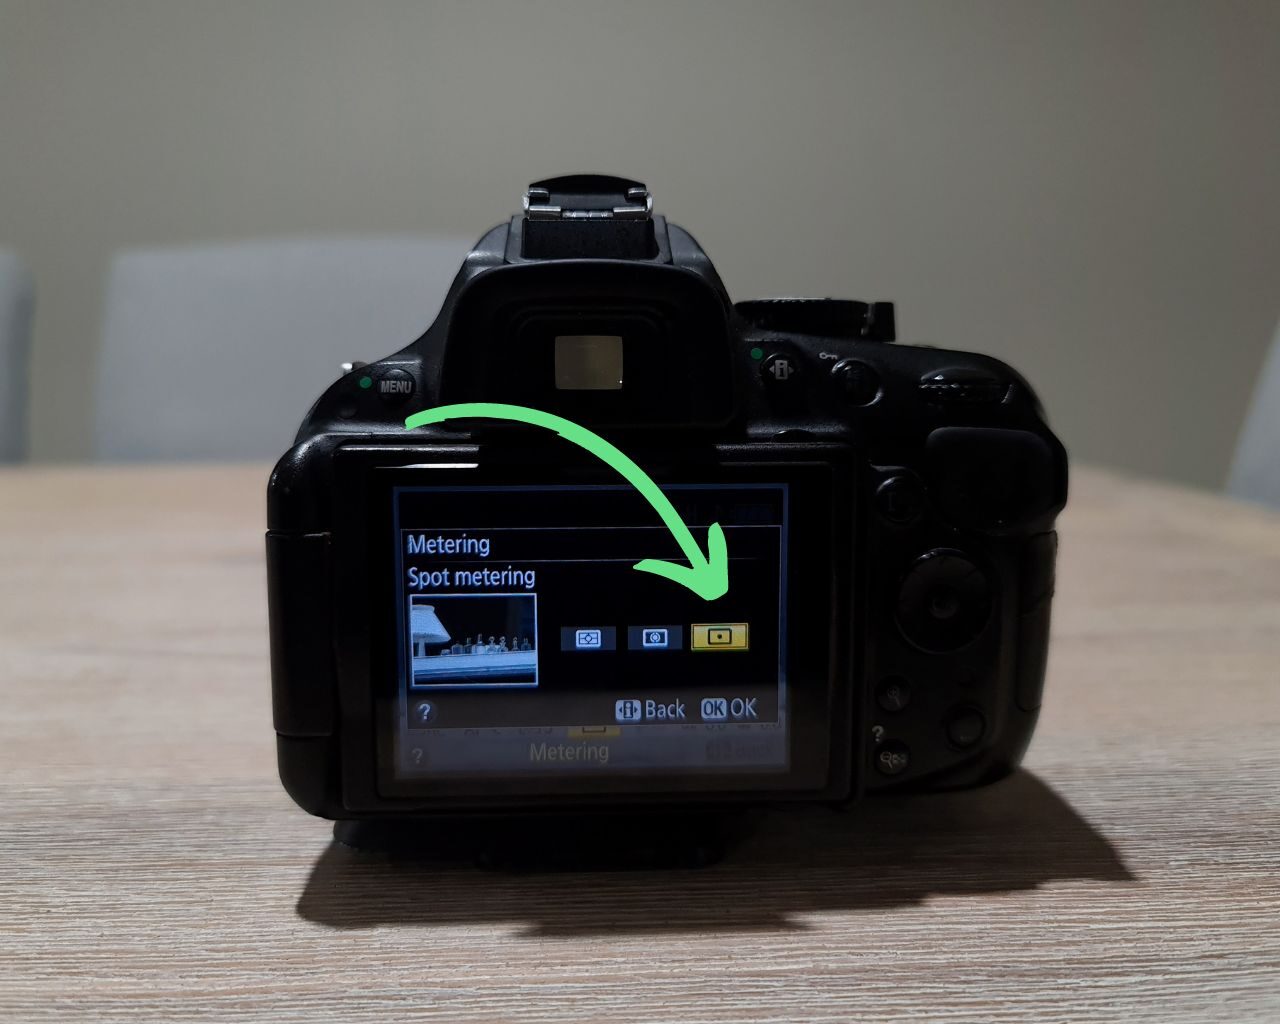
Metering
Metering is how your camera measures the brightness of the subject to determine exposure. Depending on your camera model, you may have 3 or more choices within this menu.
For bird photography, set this to Spot Metering. The bird is the subject and therefore, you want to expose for the bird. If you are shooting RAW (which you should be) you can bring back any overexposed highlights or underexposed shadows resulting from exposing for the bird in post-processing.
Release Mode
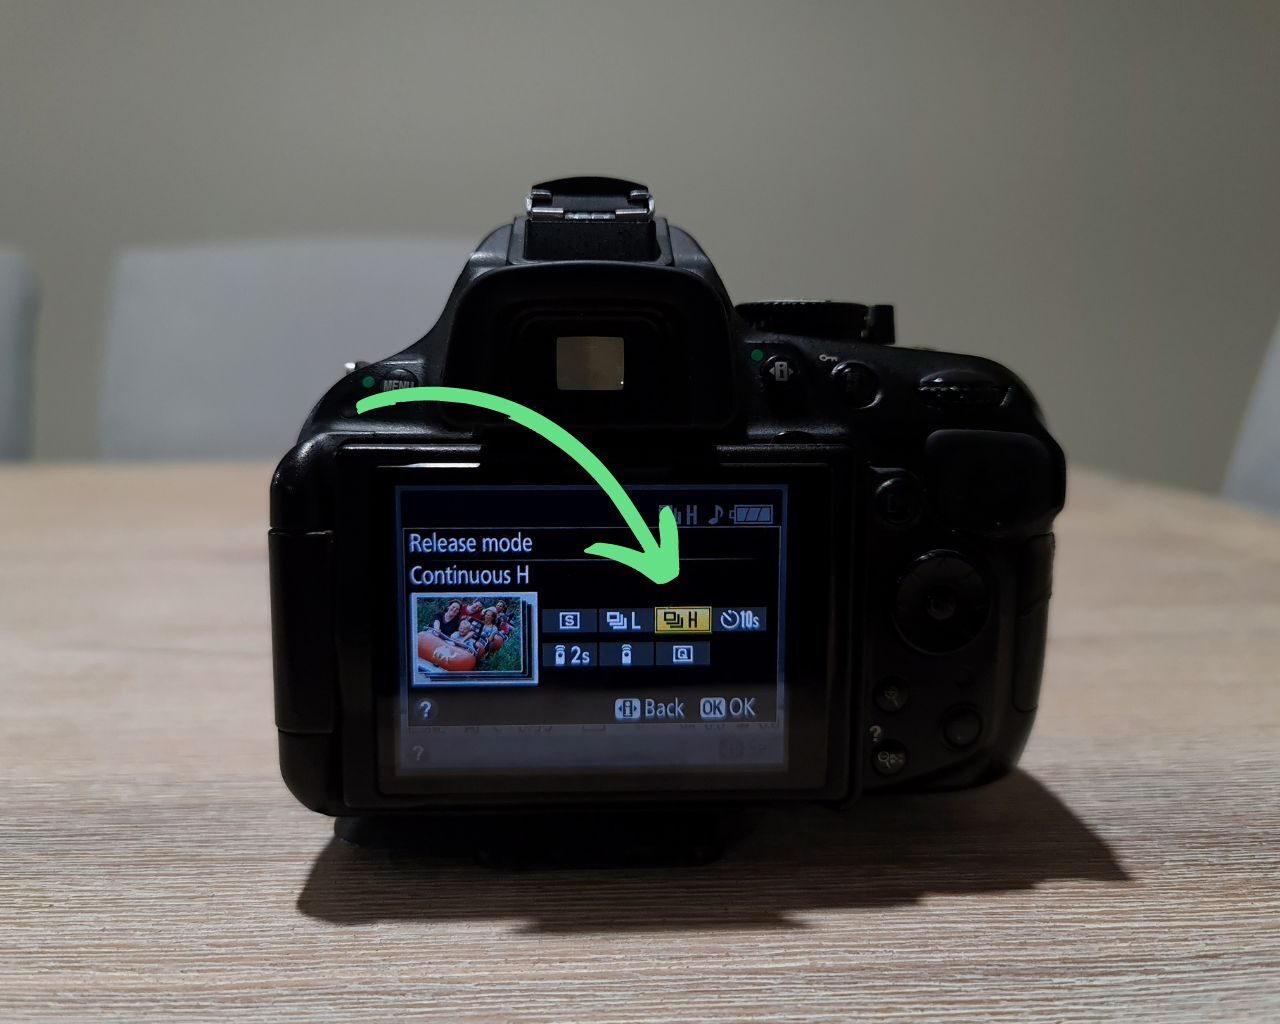
The release mode setting controls when and how often your camera shutter fires when you take a photo. The particular settings we’re concerned with here are the Continuous modes.
Depending on your camera model, you may have one or two options for continuous release. You may have Continuous L and Continuous H. The setting you want for bird photography is Continuous H. This will mean every time you press the shutter button, your camera will take multiple exposures instead of just one.
This is advantageous for bird photography because while it does fill up your SD card faster, it ensures that you get more shots in focus. It’s the law of averages – the more shots you take, the more chance you have of getting a good one.
Having the shutter fire multiple times with one press also avoids camera shake as you are not performing the physical action of pressing the button each time.
Bird Photography Settings For Nikon DSLR Cameras – Shooting Mode
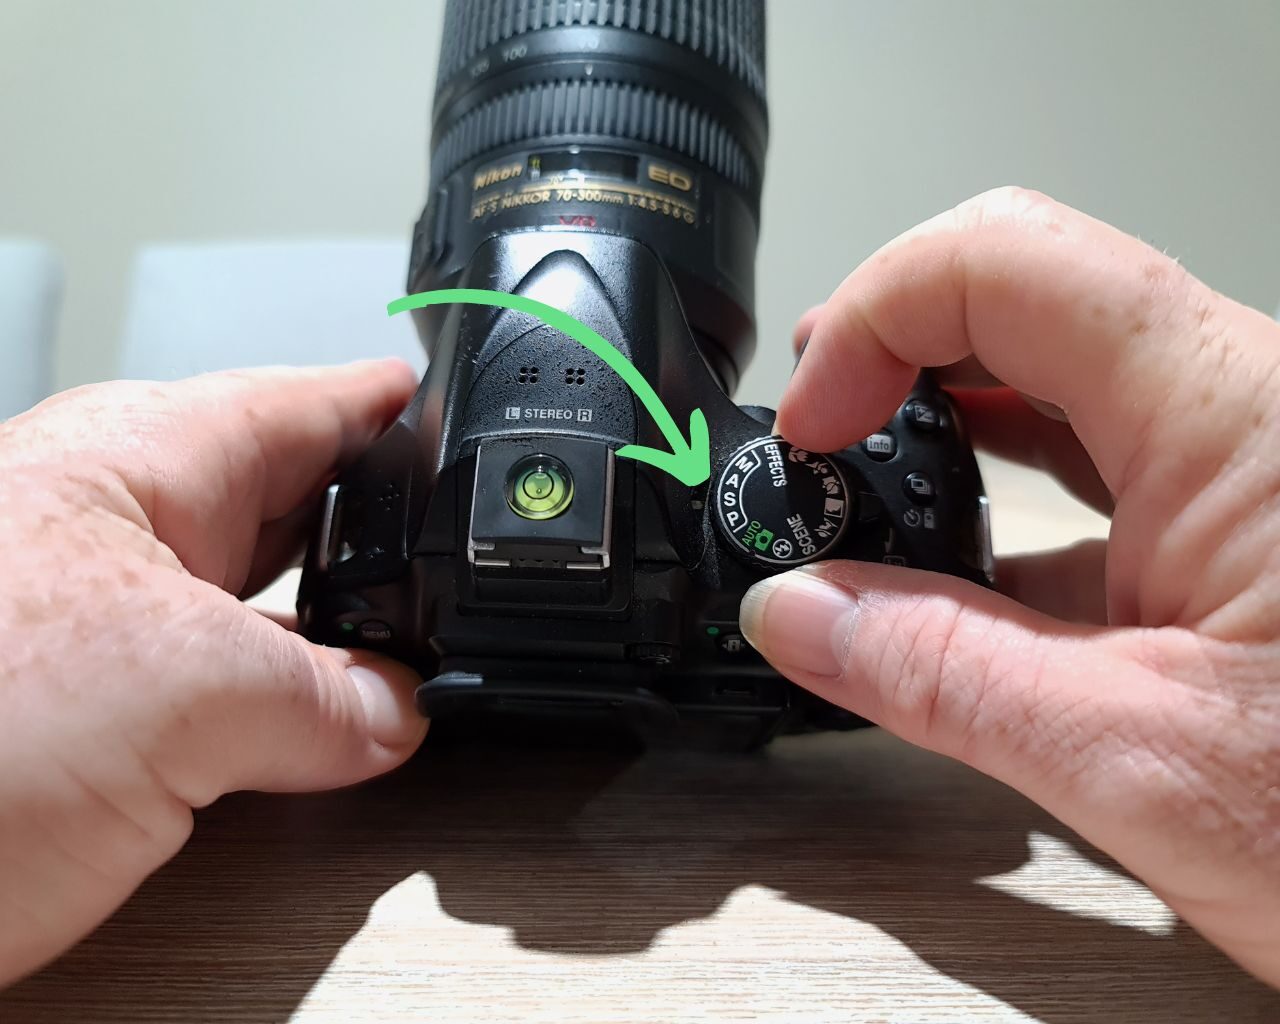
This is the section of the article that may make you feel a bit nervous. What I’m going to ask you to do here is set your shooting mode to Manual.
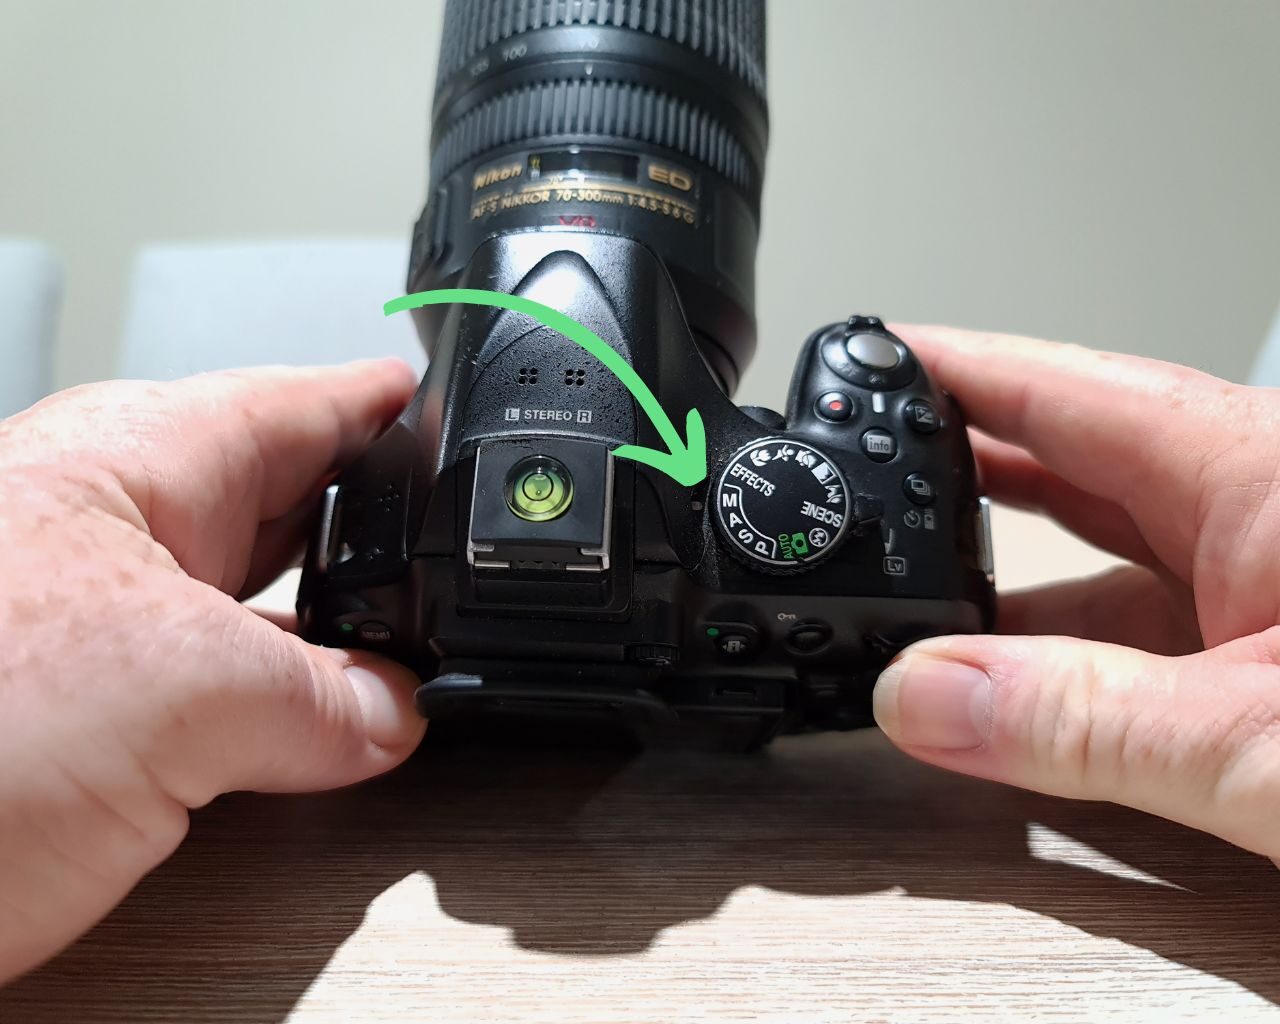
You might have already dabbled in manual shooting or it may be the thing about your camera that scares you the most. Either way, you do not want the camera to be in control when shooting bird photography. Choosing manual mode ensures you are running the show and can control everything.
Later in the article, I will explore some alternative options to manual mode. Click here to skip to that section if you’re too afraid to move the dial to M.
Bird Photography Settings For Nikon DSLR Cameras – Focus Mode
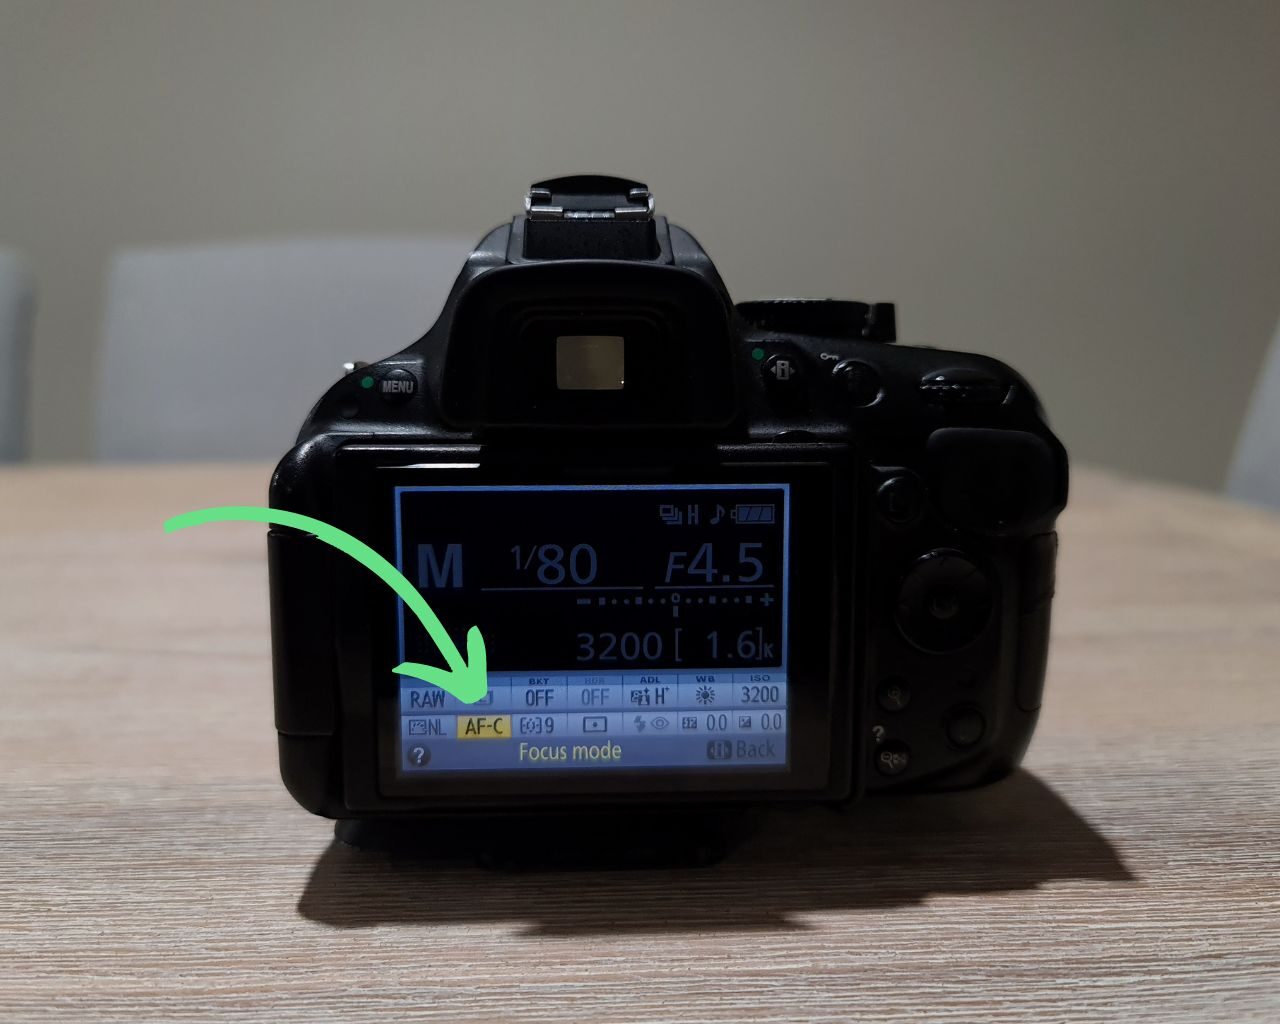
All the other settings we’ve looked at so far are important but they are nowhere near as important as the Focus Mode. If you get this wrong, you will end up with a whole lot of blurry photos. This is where the limitations of your camera will become apparent. If you don’t have the focus mode options I’m going to talk about then bird photography with your camera is going to frustrate you.
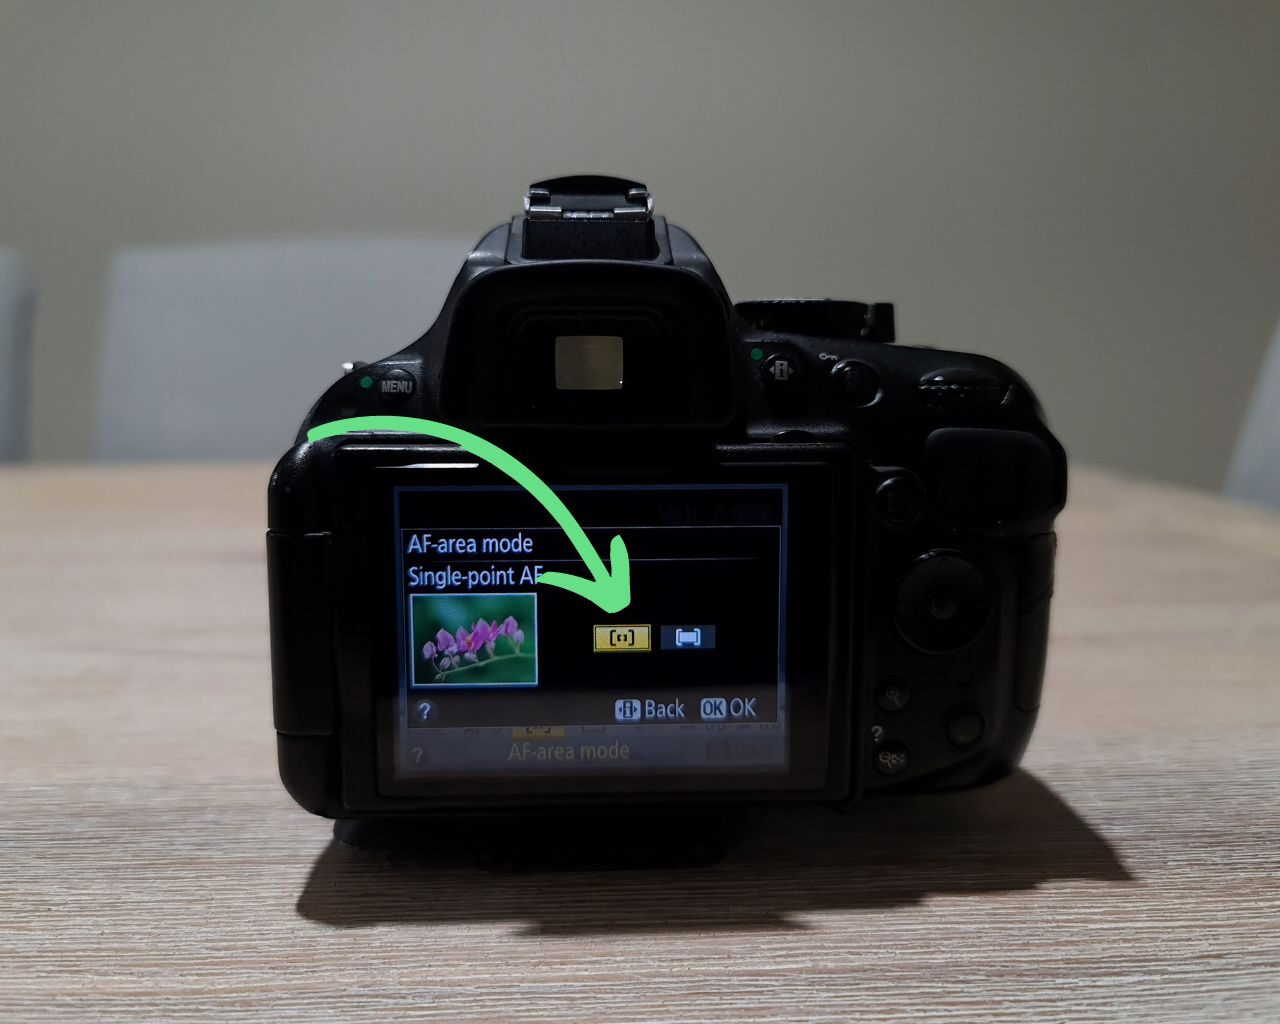
The Focus mode and AF-area mode settings should be side by side on your camera’s Information Display. These two settings go hand in hand so I will talk about them both in this section.
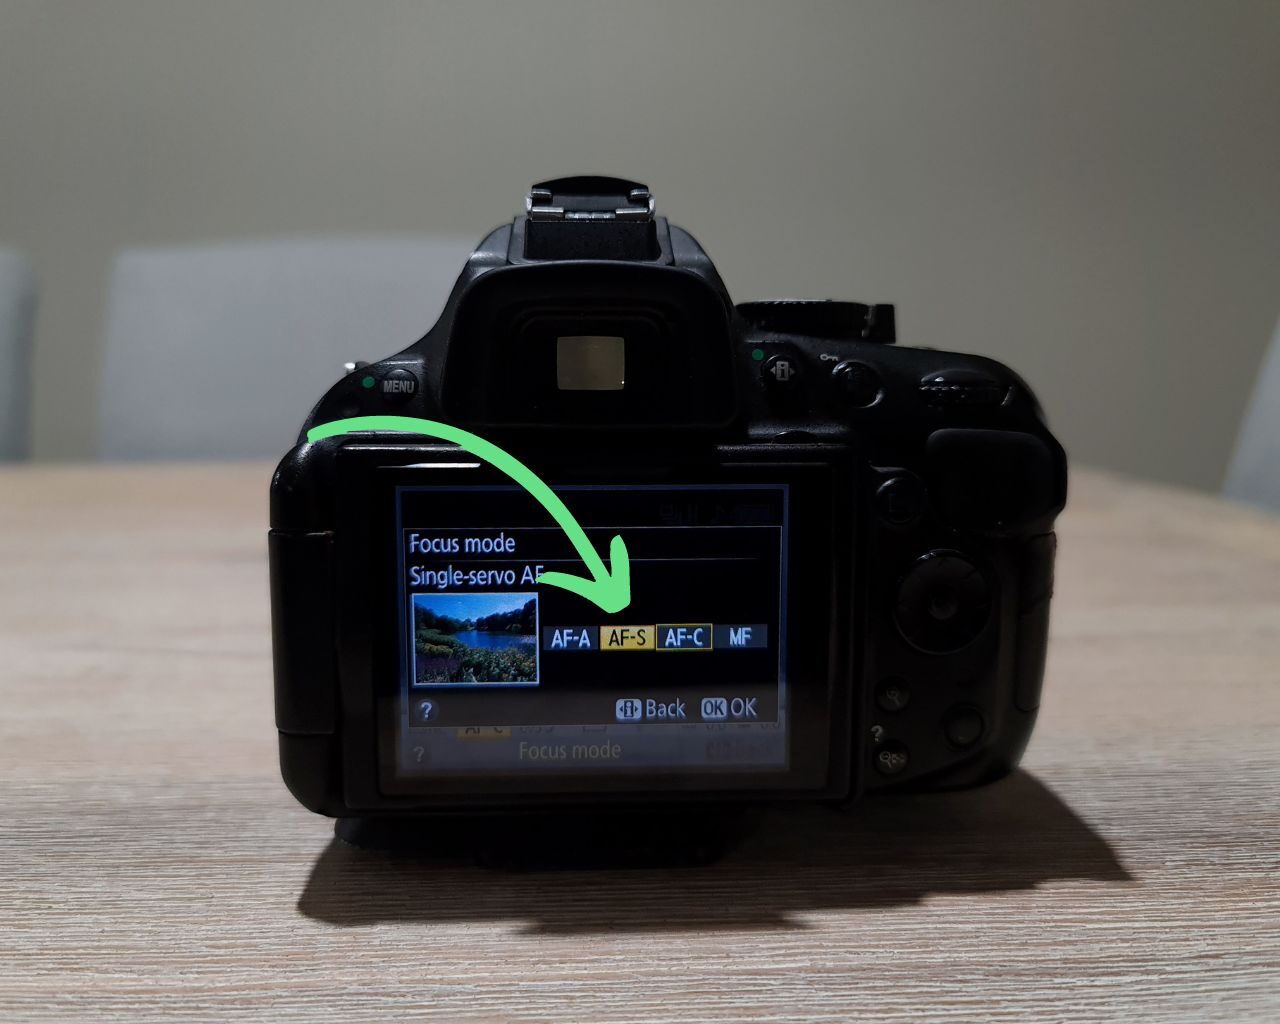
For stationary birds, you can choose AF-S (Single-servo AF). This will focus the camera when the shutter button is pressed halfway and lock the focus when it’s achieved. In addition to this, choose a Single-point AF-area mode. With a single-point AF area, you can choose where you place the focus point. If you select Auto Area-AF, the camera will choose and you don’t want that.
Learn more about focusing for bird photography in this article here on the site.
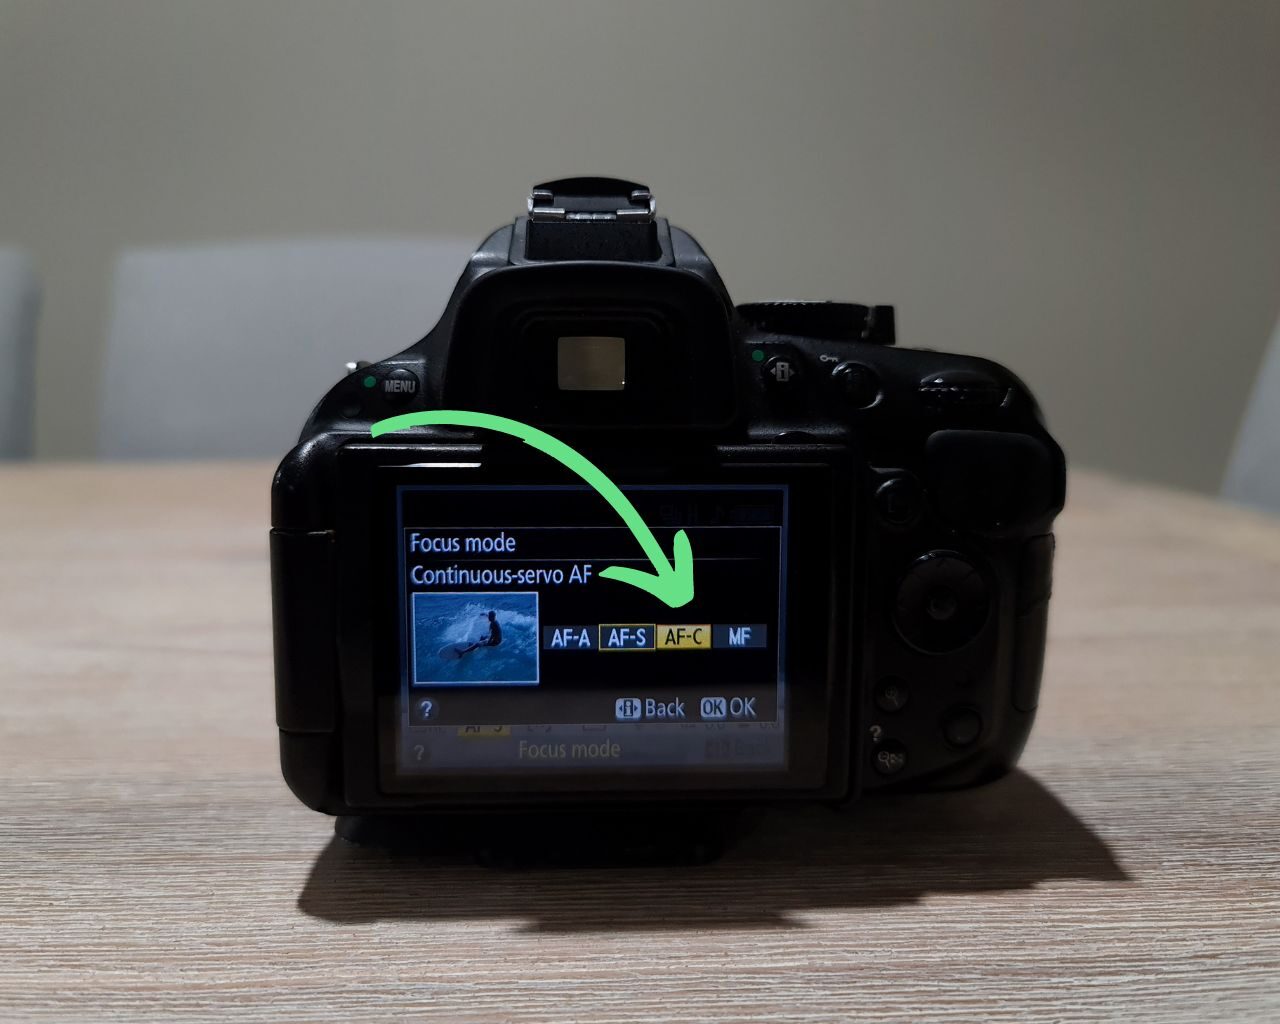
For moving or flying birds, you should choose AF-C (Continuous-servo AF). This will make the camera focus continually when the shutter button is pressed halfway. As your subject is moving, this is the best option. The AF-area mode you choose here will depend on the situation.
See below for my recommendations:
| Situation | AF-area mode |
|---|---|
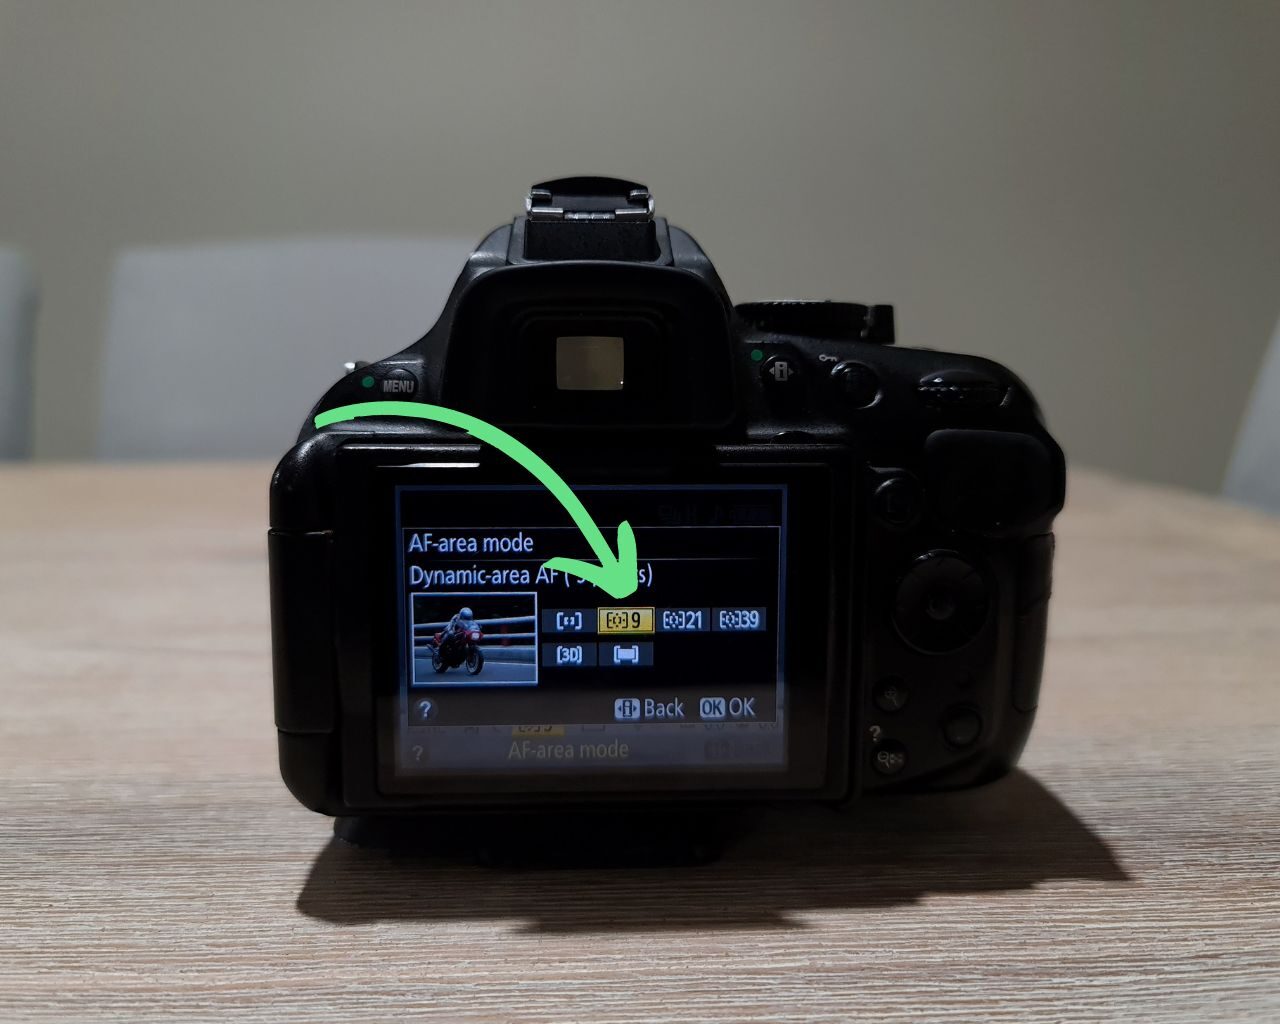
| Bird moving about on the ground | 9 point (or similar low- numbered option) |
| Bird flying in a busy background | 9 point (or similar low- numbered option) |
| Bird flying in a cloudy sky | 9 point (or similar low- numbered option) |
| Bird flying in a clear blue sky | 21 or 39 point (multiple point option your camera has) |
The settings in the table above are based on a Nikon D5200 or similar camera. Your camera may have more or less AF-area mode options in regard to how many focus points you can select. The age of your camera will also have a bearing on this; more modern cameras will have better focus mode and focus point options.
There is an autofocus technique called back button focusing which can negate the multitude of options above. You can read about setting up back button focusing on your camera in this article here.
Bird Photography Settings For Nikon DSLR Cameras – The Big Three Settings
To this point, you have probably been wondering why we have not discussed aperture, shutter speed, or ISO yet. After all, they are what you were searching for I assume? Now that you have everything else set up, we can discuss the big three.
Aperture
The aperture you choose for a bird photo will depend on many factors:
- What lens you are using (each lens has a set aperture or aperture range)
- The amount of light available (low light will mean you have to open the aperture wider)
- How much you want to blur the background (wider apertures produce blurrier backgrounds)
- How sharp you want your image to be (each lens has a sweet spot)
- What shutter speed you want to use (aperture, shutter speed, and ISO are a balancing act)
- What ISO you want to use (aperture, shutter speed, and ISO are a balancing act)
A lot of lenses have an aperture range in which they take sharper photos. For most lenses, it is within the f/8.0 to f/10 range. If you’re using a more expensive lens, you may find it is sharp throughout more of the aperture range.
I used to favor f/8.0 when using my AF-S Nikkor 70-300mm f/4.5-5.6 G ED lens because it takes sharp photos at that aperture. That being said, I have taken sharp images with it lately at f/5.6. It depends on the lighting conditions and the ISO and shutter speed you choose. You have to experiment and discover the sweet spot for your lens.
If you are trying to blur the background of your bird images, the aperture affects this. Generally, the wider your aperture is, the blurrier the background in your photo will be. Other factors affect this such as:
- The distance from you to your subject (the closer you are, the blurrier your background will become)
- The focal length you are shooting at (zooming in blurs the background more)
- The distance between the bird and what is behind it (the further away the background is, the blurrier it will be)
The image examples below show how zooming in can blur the background more. Each image was taken with the same settings, only the aperture changes.
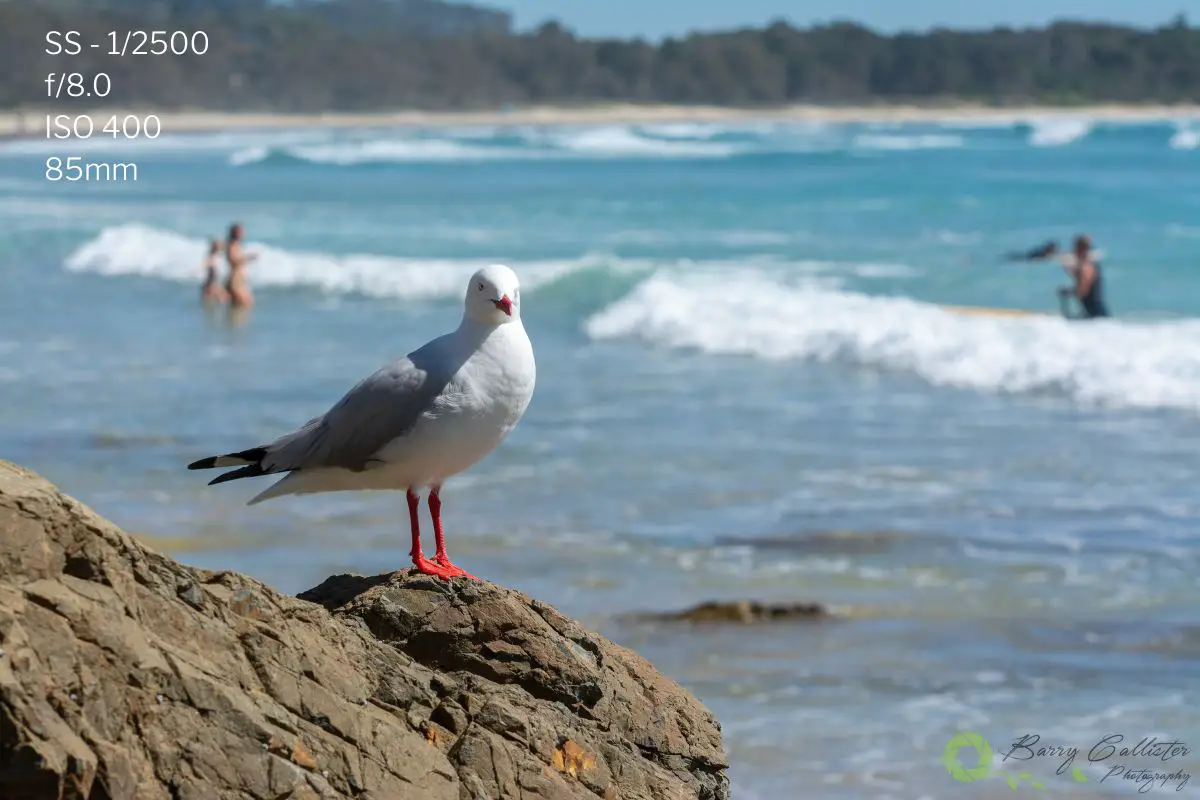
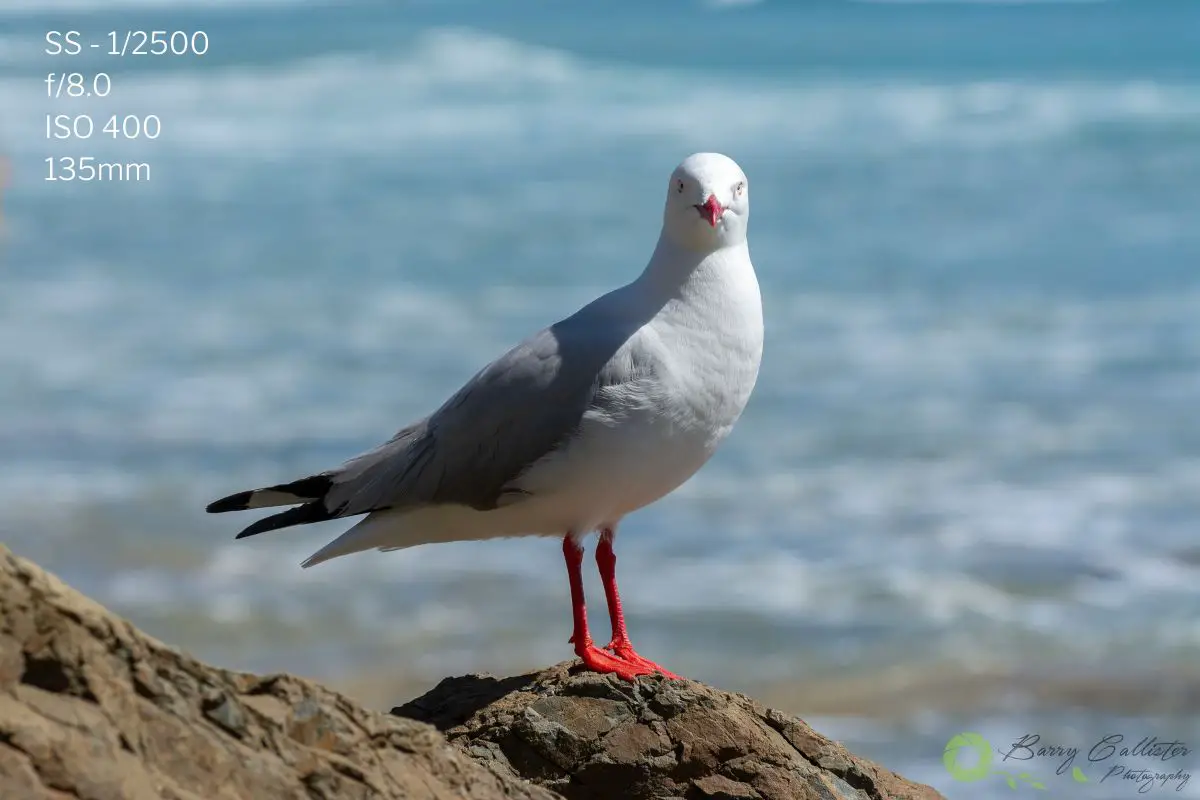
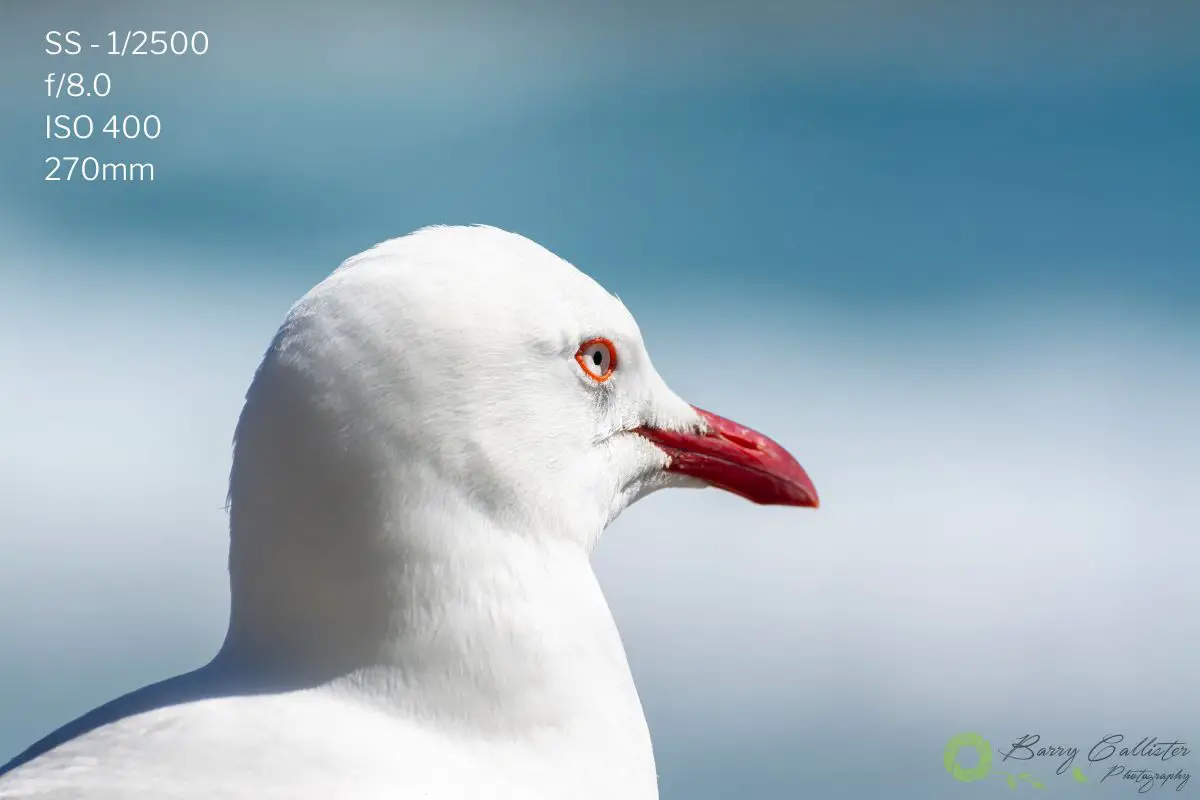
I urge you to experiment with different aperture settings and see the effect they have on your images. Do this at home using props; you don’t want to do this in the field and ruin a brilliant shot.
Learn how much zoom you need for bird photography in this article.
Shutter Speed
Of each of the big three; this is the easiest setting to predict. Shutter speed controls the appearance of motion in your photos. If you want to freeze motion, you choose a faster shutter speed. If you want to blur movement in a photo, choose a slower shutter speed.
I suggest using the fastest shutter speed you can for the light available. Faster is always better as it will eliminate any camera shake. If you are photographing a stationary bird that suddenly decides to move, a faster shutter speed will mean you are ready to freeze the action as it flies off.
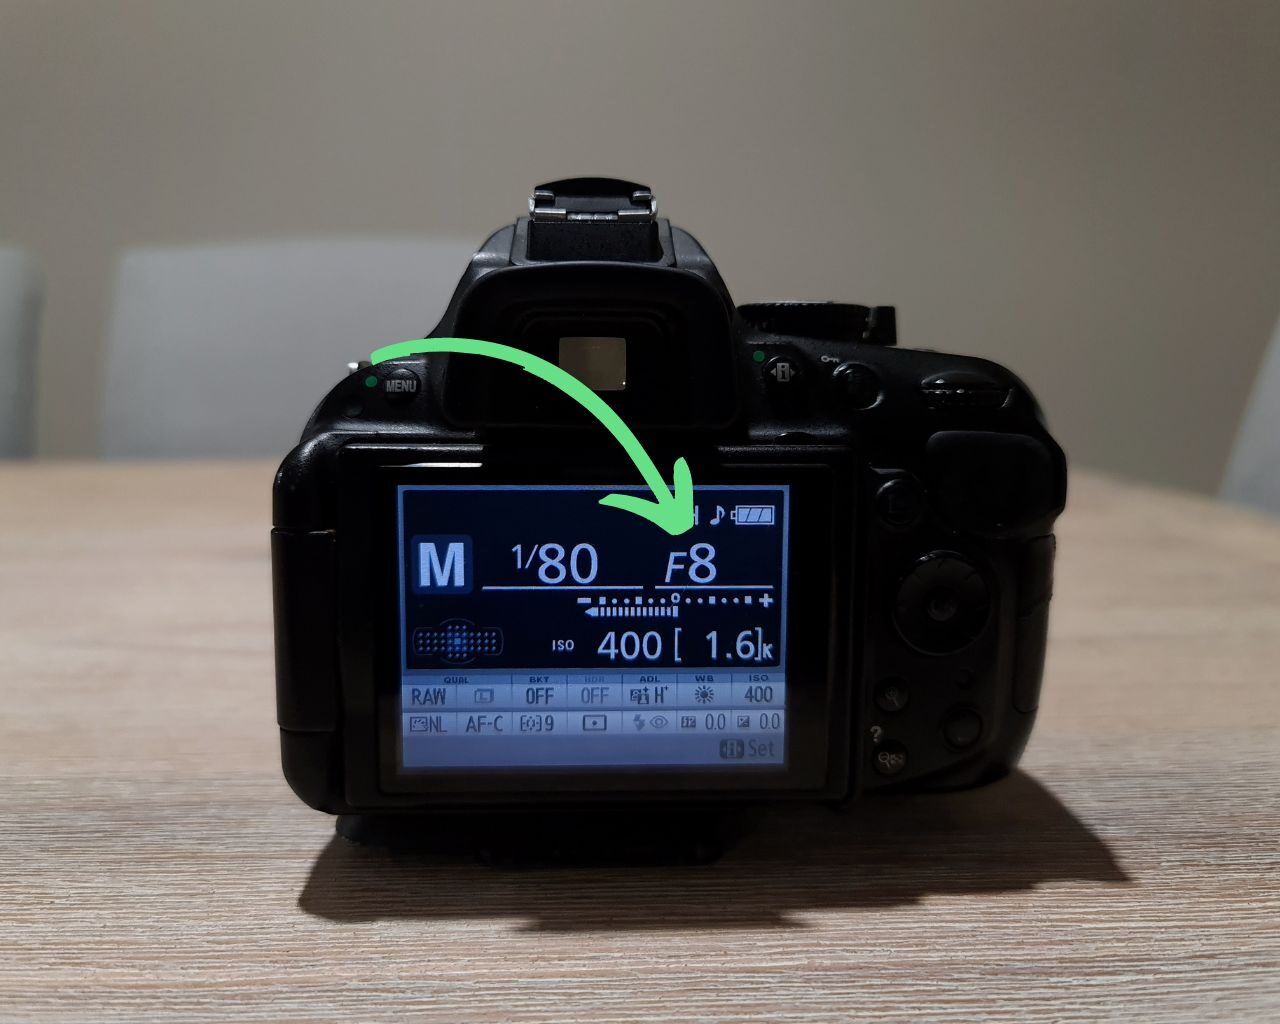
A good place to start with your shutter speed is 1/1250. Of course, in low light, you will need to use slower speeds sometimes. You might find you have to be down around 1/400 or even slower. If you have a VR lens, you may get away with really slow shutter speeds like 1/100 or 1/80 if the bird is completely still.

ISO
ISO is the last setting you should decide on. Where you set this will help to achieve the shutter speed and aperture you want to use.
If you have chosen your aperture and shutter speed and still don’t have the right exposure, you will need to raise or lower your ISO. In brighter environments, you will be able to use lower ISO values. If you don’t have a lot of light, you will have to raise it.
The only concern you have with older cameras or those with smaller sensors (APS-C) is that raising your ISO will produce a lot of noise in your photos. Full-frame cameras deal with higher ISOs much better.
You can always use a plugin for Lightroom and Photoshop called Topaz Denoise AI to remove noise. The noise removal in Denoise is so much more powerful than that of Lightroom and Photoshop. It removes the noise without removing too much of the detail in your images.
I always set my ISO between 400 and 640 for sunny conditions. This allows me to use f/8.0 and shutter speeds of 1/1500 or faster. I will raise or lower it if I need to.
Alternatives To Manual Mode
If you are too scared to switch to manual mode, there are other ways you can approach bird photography settings.
Firstly, you could choose Shutter Priority Mode. In this setting, you decide the shutter speed and ISO you want and the camera will set the aperture. If you’re not a control freak like me, this will be a good alternative for you.
The other option you have is to use manual mode or shutter priority mode with Auto ISO. You can enable auto ISO in the ISO Sensitivity Settings section of the Shooting Menu. That’s where it is on the D5200, it may be elsewhere in your camera’s menu.
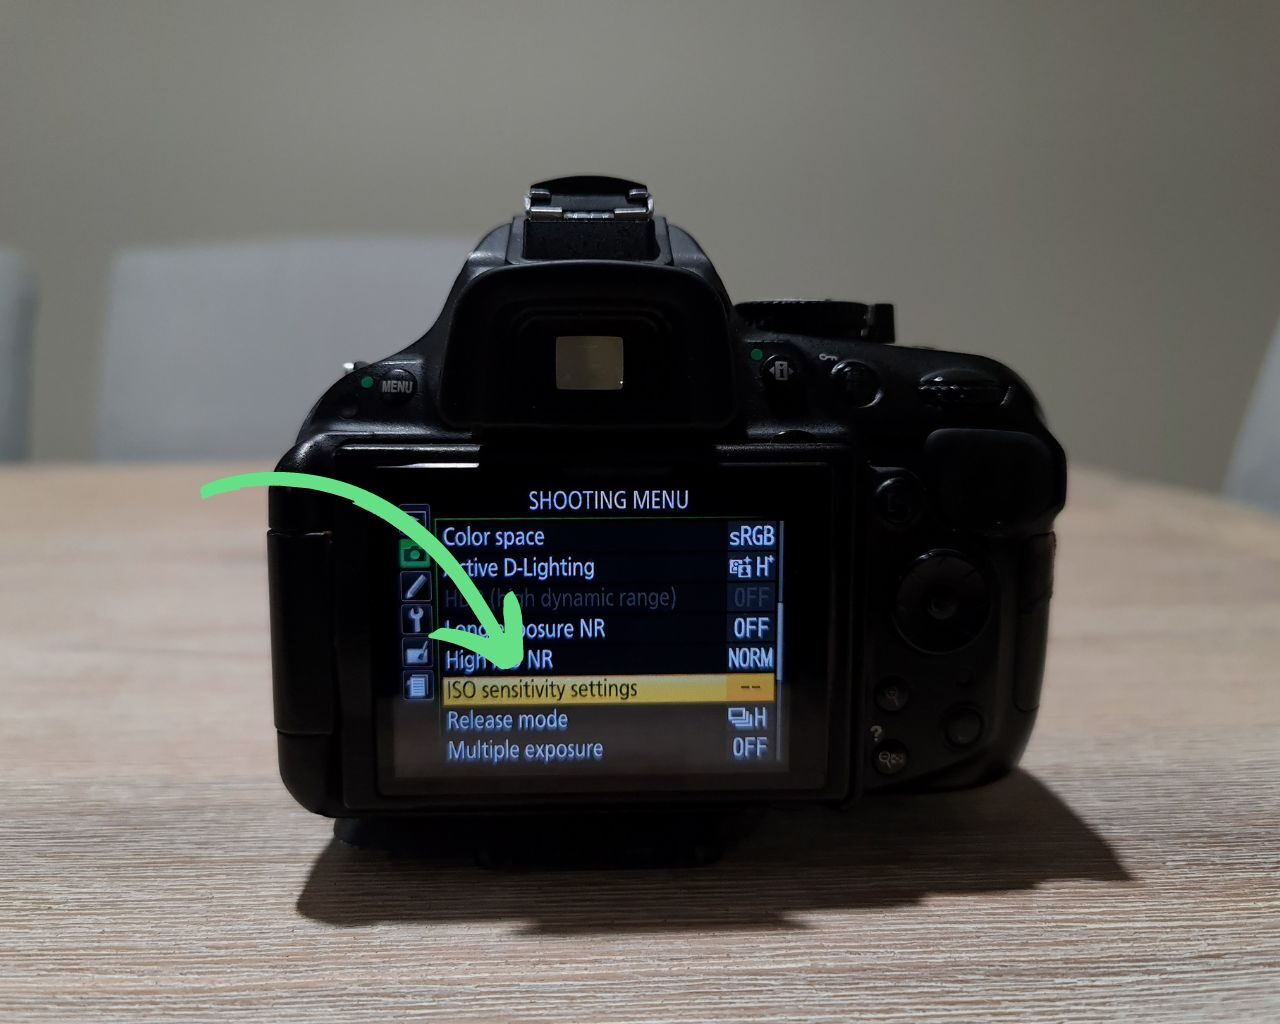
Auto ISO in manual mode gives you one less thing to think about. I have found with the D5200 that it did slow down the focus of the camera as it was having to deal with too much data at one time.
Summary
Let’s break down the settings you need for bird photography. Keep in mind these are only guidelines and the settings you end up with will be determined by the light you have available.
| Setting | Choose |
|---|---|
| Image Quality | RAW |
| White Balance | Daylight |
| Metering | Spot |
| Release Mode | Continuous H |
| Shooting Mode | Manual |
| Focus Mode (Stationary birds) | AF-S and single point AF-area mode |
| Focus Mode (Moving birds) | AF-C and low number AF-area mode for busy backgrounds, high number AF-area mode for clear sky |
| Aperture | Start with f/8.0. Change for exposure or to blur the background |
| Shutter Speed | Start with 1/1250. Change for low light |
| ISO | Start between 400 and 640. Raise or lower depending on the light conditions |
This may all seem a bit overwhelming. Don’t despair, it will get easier the more you practice it. Go out and photograph birds as often as you can and take notice of the settings you use. When you get a good shot, analyze the settings, figure out why it worked, and do that again next time.
Good luck. Thanks for reading this post today. I wish you many great bird photos.