Birds do a huge variety of different movements: they fly, scratch, bounce, jump, shake, fight, hang upside down, and do a myriad of other things. So as bird photographers, how do we capture all this action and manage to keep it in focus? What focus mode should you use for bird photography?
As a general rule, the best focus mode for bird photography is Continuous Autofocus (AF-C), called AI-servo on Canon cameras. When used in conjunction with back-button autofocus, continuous autofocus allows you to photograph both stationary and moving birds without having to change focus modes.
In the remainder of this article, we will look at Continuous Autofocus in more detail as well as explore the technique of back-button focusing. You will learn how to set up back-button auto-focus on your camera and how to use it to get great images of birds.
As an Amazon Associate, I earn from qualifying purchases. Birdwatch World earns commissions from Amazon and similar affiliate programs from any purchases made via links in this article.
The Focus Mode You Should Use For Bird Photography
What Is Continuous Autofocus?
Continuous Autofocus goes by many names in the photography world:
- Continuous Autofocus
- AF-C (Nikon, Sony, Panasonic, Fuji, Pentax)
- Continuous-servo AF (Nikon)
- AI-servo (Canon)
- C-AF (Olympus)
- C (Minolta)
Whatever it is called in your particular model, it is the focus mode where your camera will continually adjust focus to keep a moving subject in focus.
It does this by using one of many focus points which you select in your camera’s menu. In this mode, the focus does not lock but is continually adjusting as long as the shutter button is half-pressed.
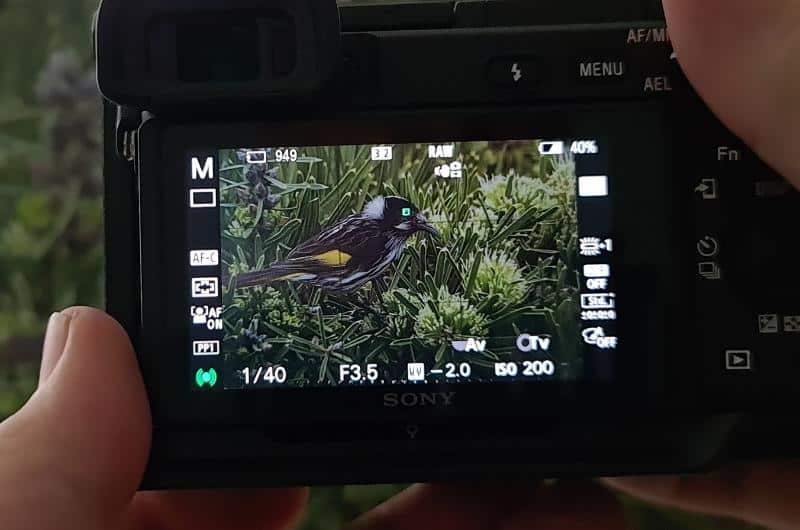
An important setting when using AF-C is the selection of focus points. Your camera will allow you to select anywhere from 1 to 759 points (Learn more about the Sony a7 IV on Amazon/Adorama/eBay) depending on which brand/model you have. The camera will then use the active focus points to achieve focus via phase detection (in DSLR cameras) or contrast detection (in mirrorless cameras).
For a great explanation of phase and contrast detection, watch this video from B&H Photo Video:
Continuous autofocus is great for birds as it will track their movements across the frame. You can’t get good photos of flying birds without using continuous autofocus.
But what about stationary birds? How do we use it for them? Stay with me…we’ll learn about that later in the post.
What is the best f stop for bird photography? Find out in this article right here on my blog.
How Do You Set Up Continuous Autofocus?
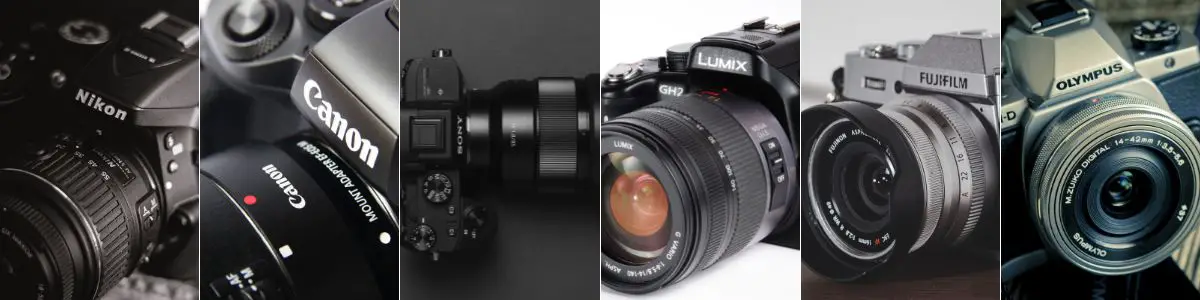
In this section of the post, we’re going to look at how to set up continuous autofocus in various cameras. We’re only going to do this for Nikon and Sony as I need to keep this article under 20,000 words?!
If you own another brand of camera, try the links below for how to set up your continuous autofocus:
Nikon AF-C Setup
Here you will learn how to do this on a Nikon D5200 as that is the camera that I own. The process will be much the same on any 3000, 5000, or 7000 series. For any full-frame models such as the 600, 700, or 800 series, or any other models, please consult your manual.
If you own a Nikon mirrorless camera, you can find your manual at this link.
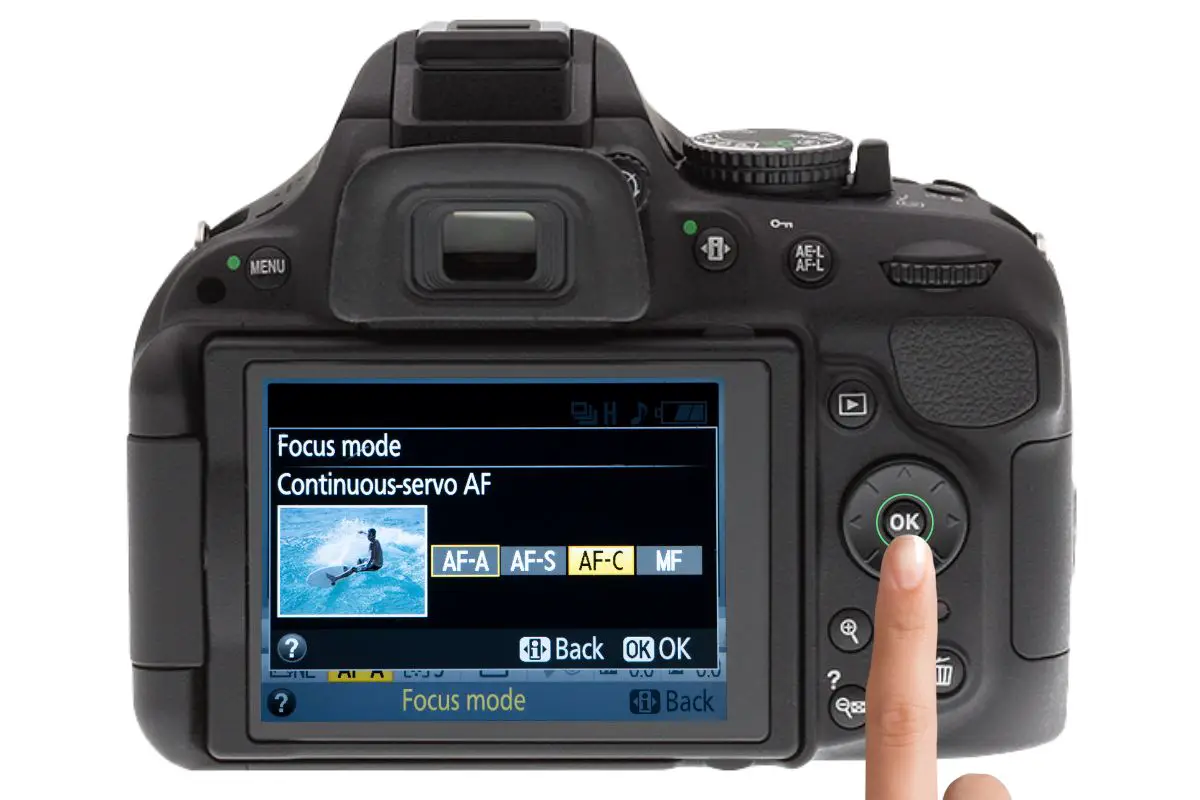
Step 1
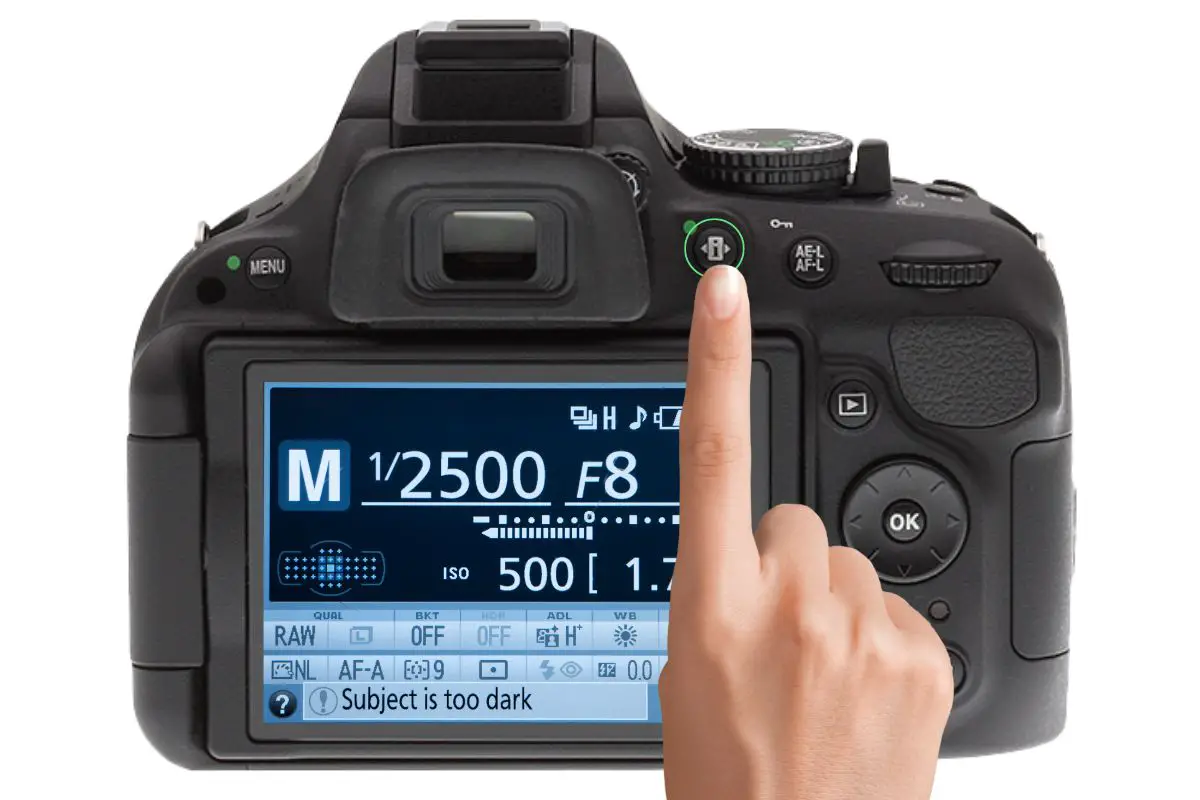
Make sure your camera is turned on and press the i Button on the back. This will bring up the information display.
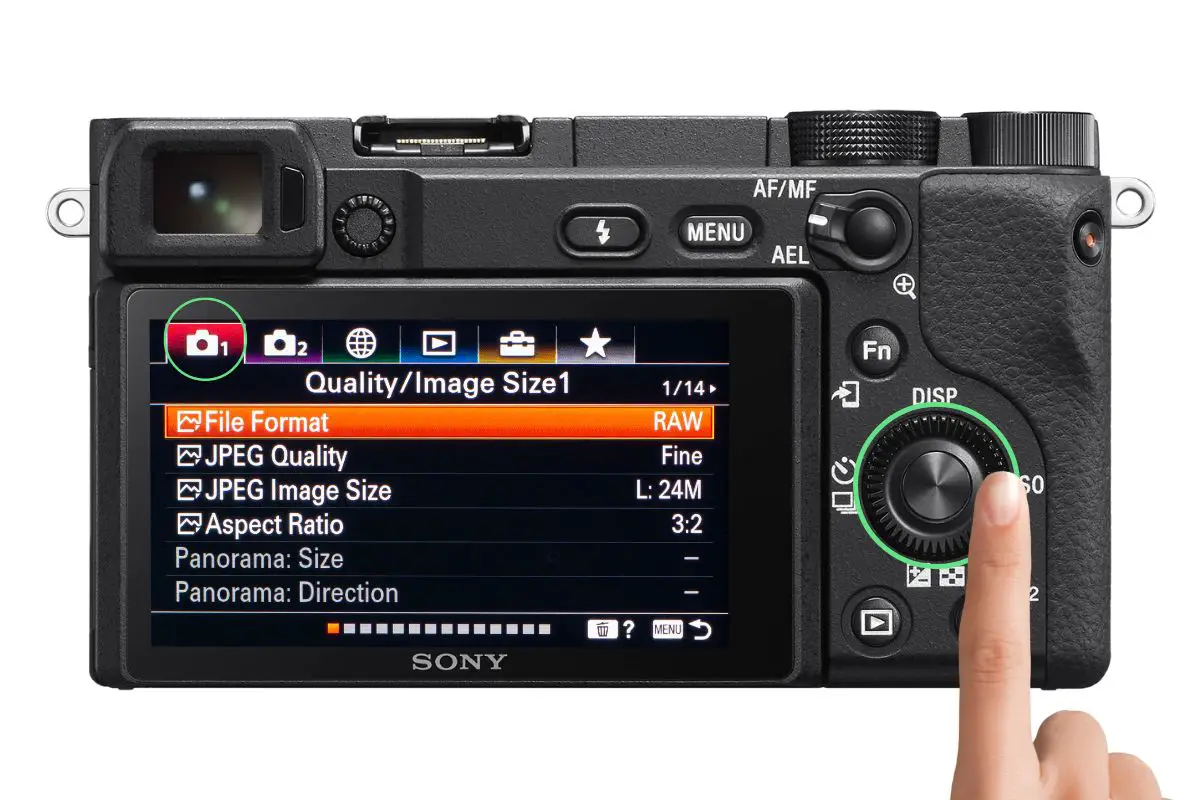
RAW or JPEG? Find out which format to use for bird photography in this article on my blog.
Step 2
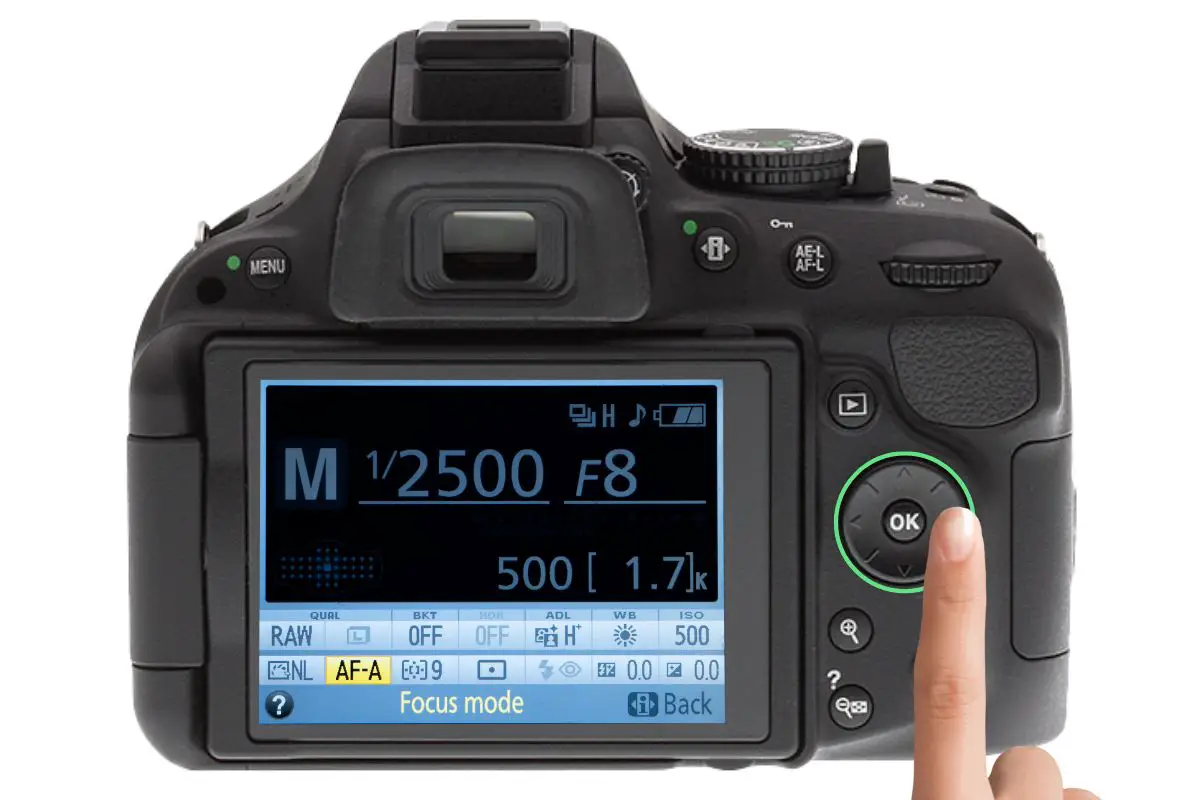
Use the multi-selector to scroll to the Focus Mode menu. Depending on what mode your camera is in when you started this, the icon will say either AF-A, AF-S, AF-C, or M. In the image below, it says AF-A.
Step 3
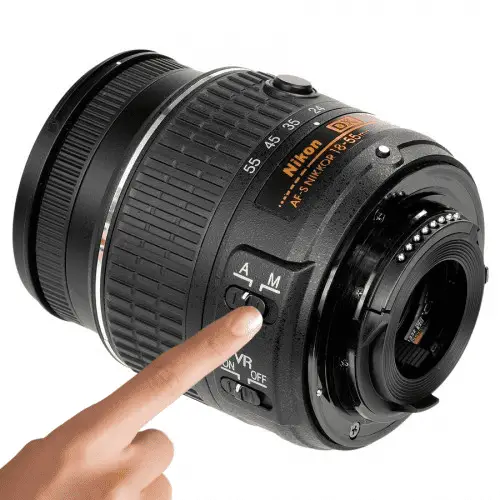
Make sure that if you have a lens with an A-M switch or an M/A-A switch, it is in the A position.
Step 4
Press the OK button to enter the focus mode menu.
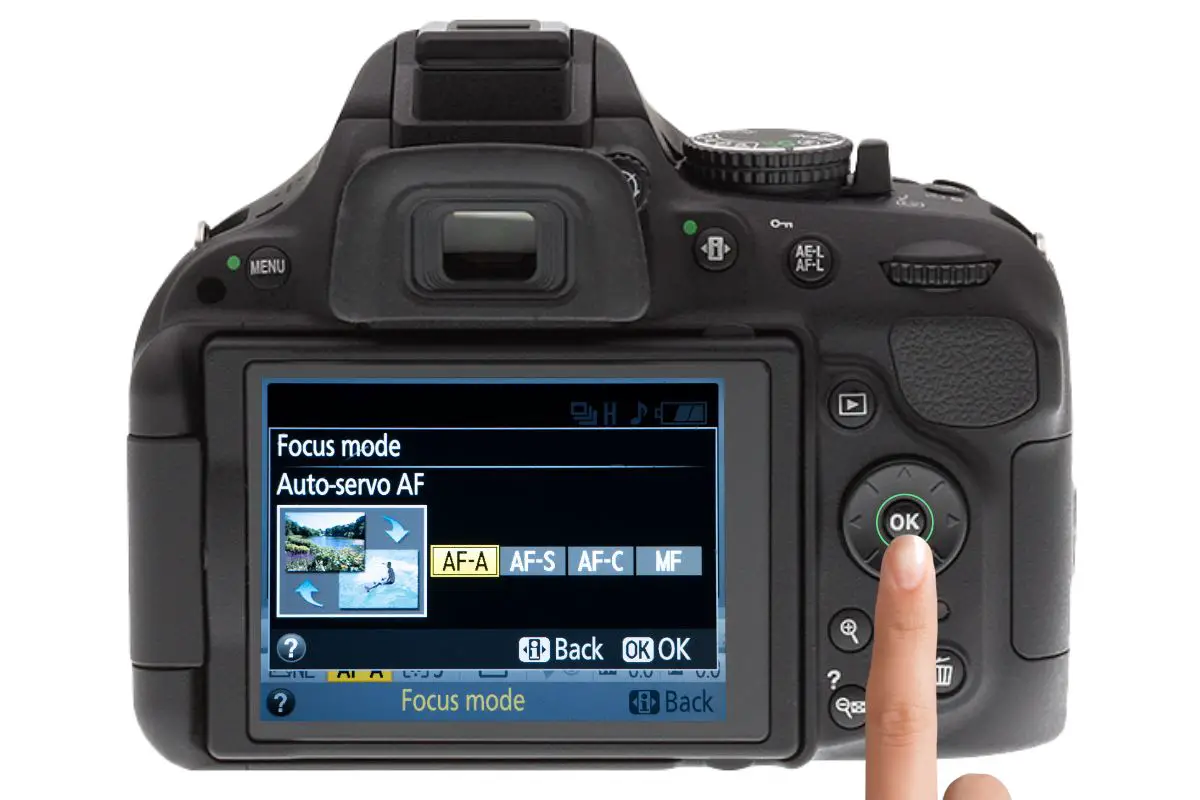
Step 5
Use the multi-selector to scroll across to AF-C. When that icon is yellow, press the OK button to select it.
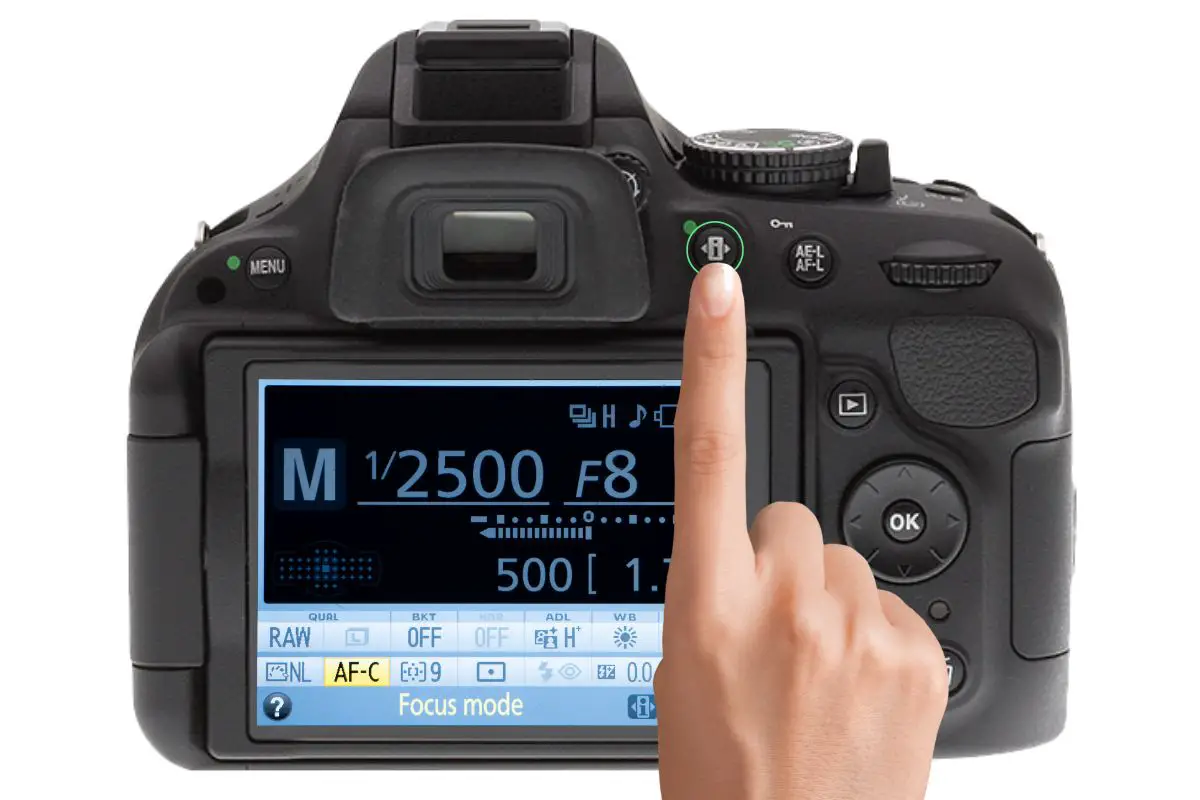
Step 6
Press the i button to exit the information display.
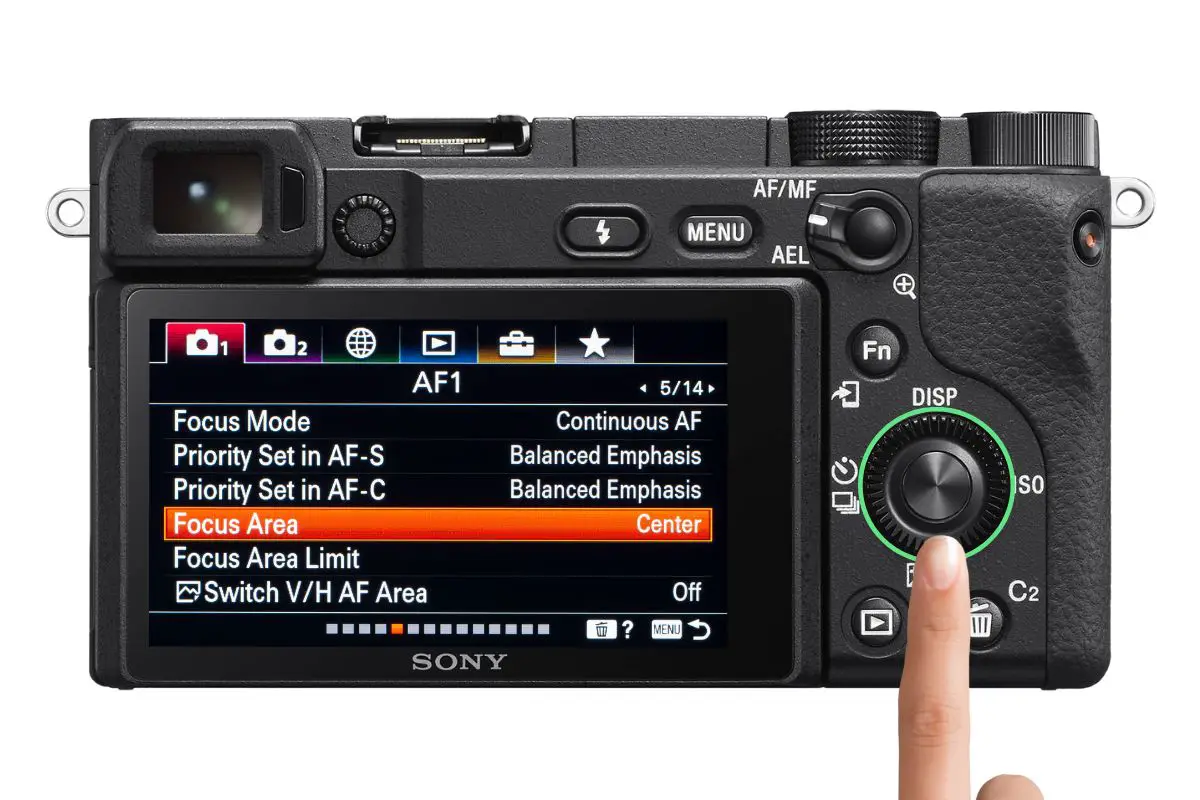
Sony AF-C Setup
The following is an explanation of how to set AF-C on the Sony a6400 which is the model I own. The steps should be the same for pretty much any Sony model however, if you find it to be different from yours, please check your camera manual at this link.
Step 1
Make sure your camera is turned on and press the Menu button.
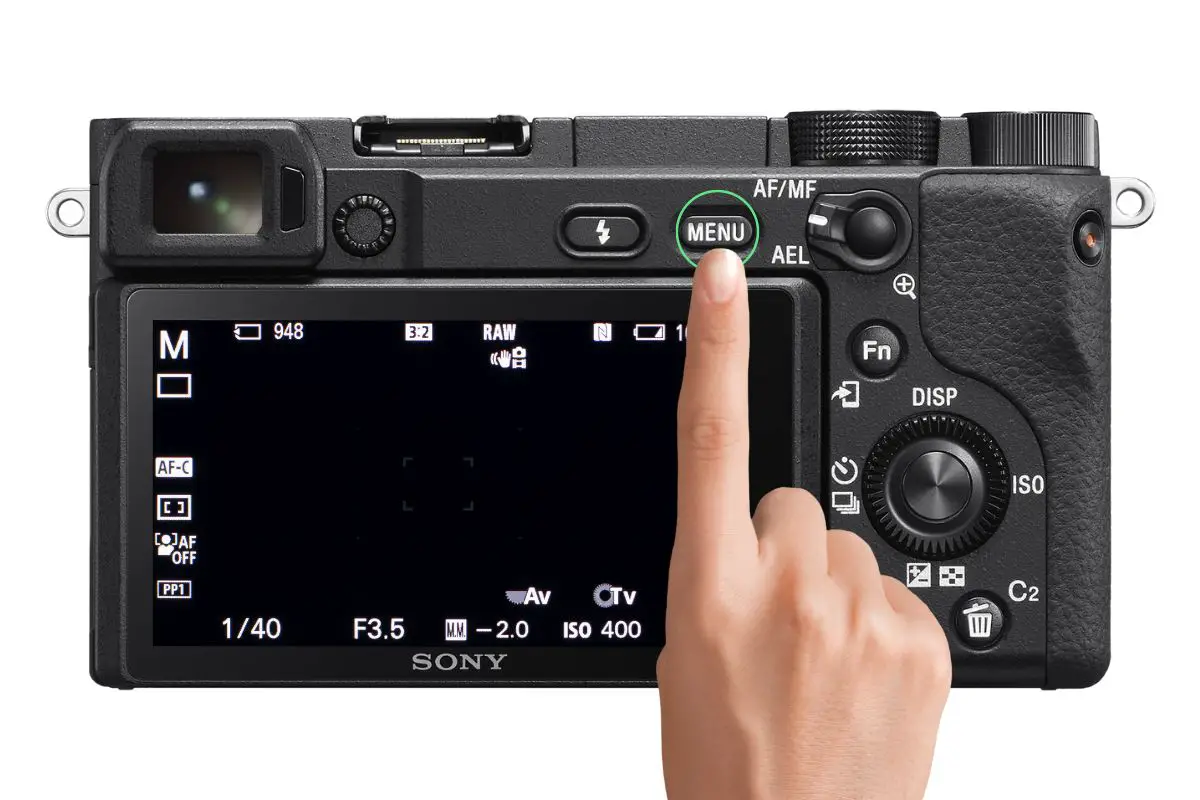
Step 2
Using the Control Wheel, navigate to the Camera Settings 1 tab.
Step 3
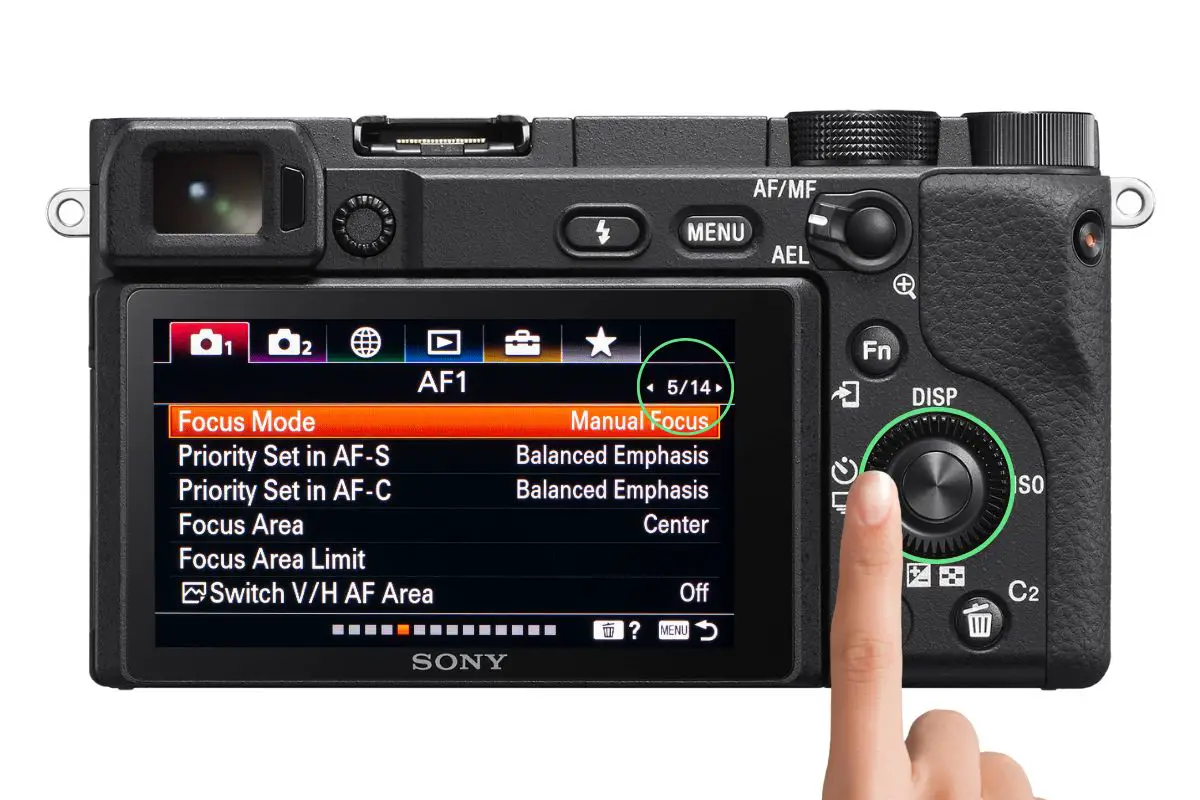
Using the control wheel again, navigate to page 5/14, AF1.
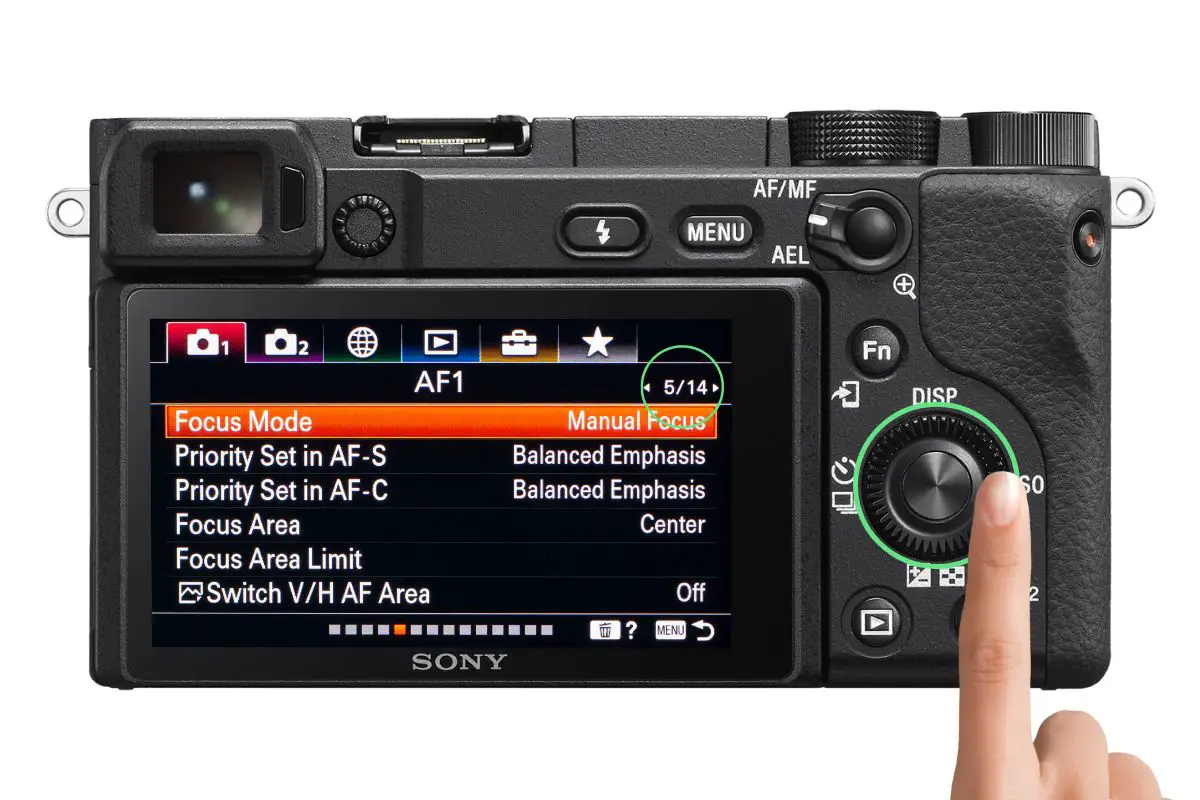
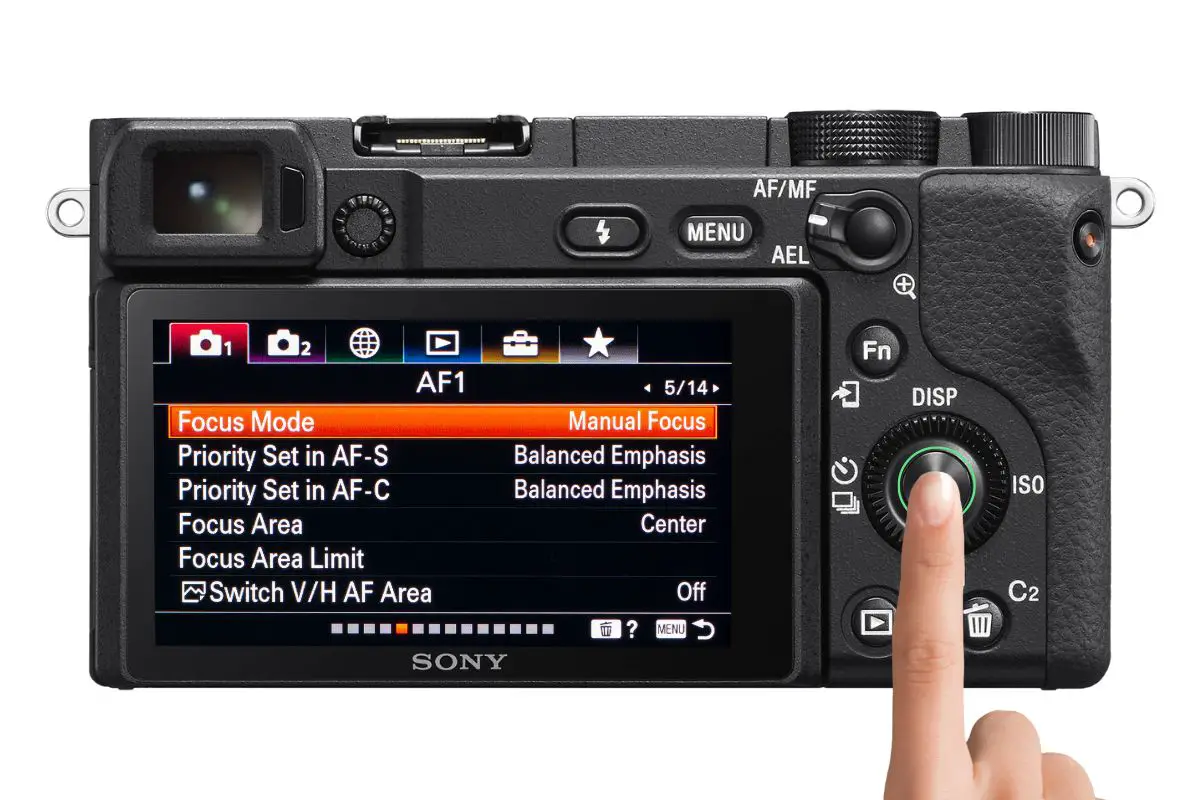
Step 4
Use the control wheel to illuminate the top item on the menu, Focus Mode. Press the center button to access that menu.
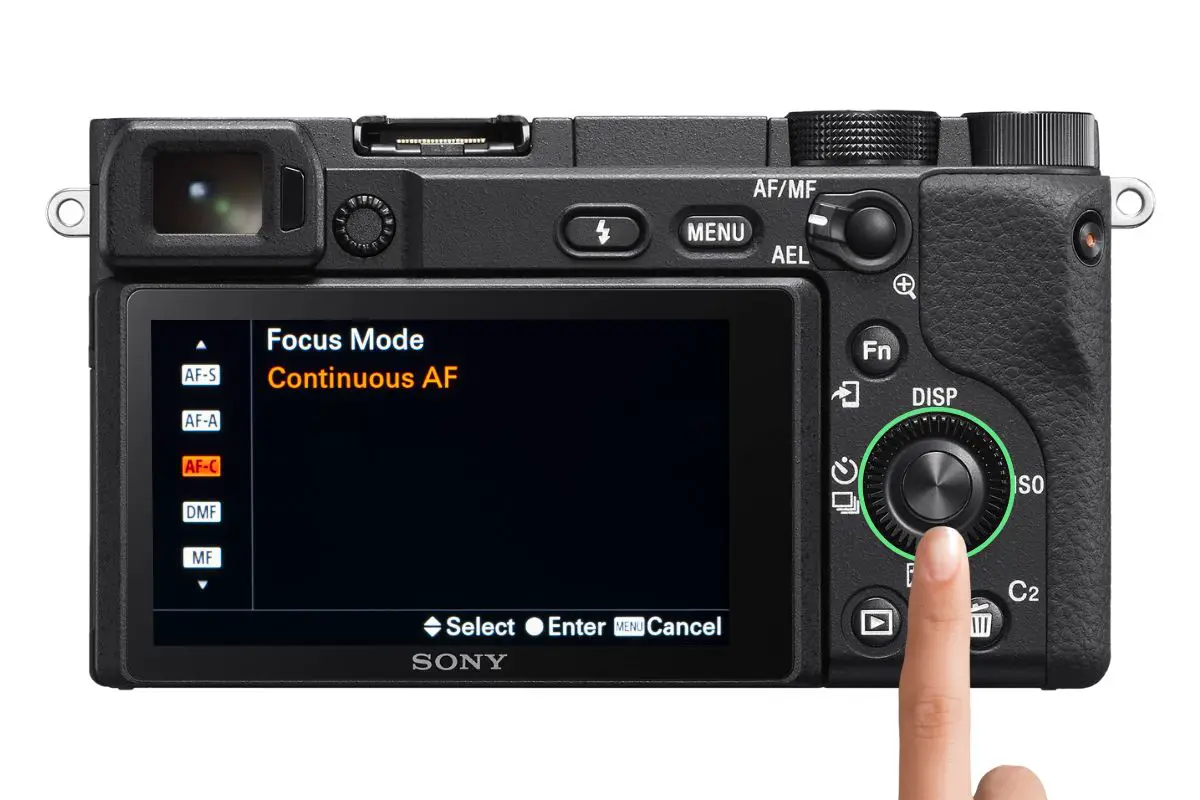
Step 5
Scroll up or down using the control wheel until AF-C is illuminated. Press the center button to turn it on.
How To Choose Focus Points
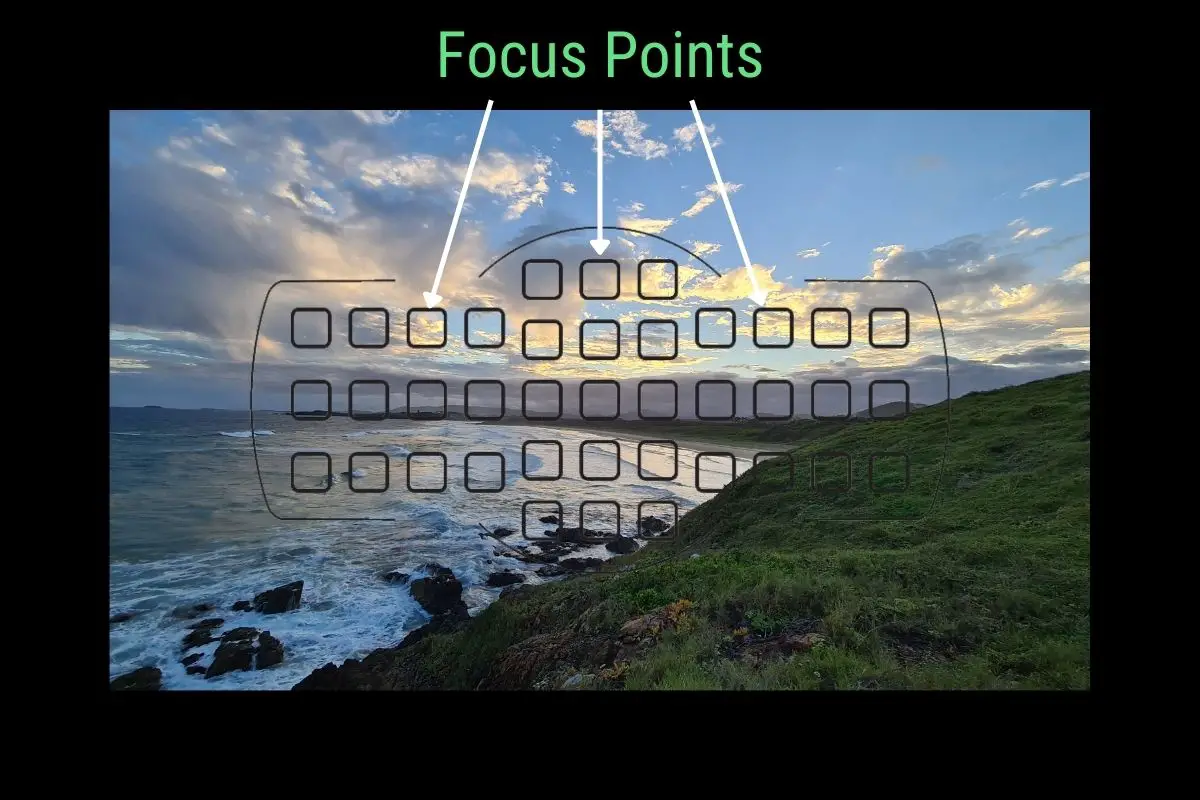
Now that you have continuous autofocus turned on, the next thing you need to do is choose the number of focus points you want (called AF-area Mode on Nikon cameras). This will depend on the type of bird photography you are doing.
Photographing stationary birds will require a different number of focus points compared to birds that are flying. What is behind the birds also makes a difference here too. For example, you can use a high number of focus points for birds flying against a blue sky. A bird flying in front of trees or bushes however requires fewer points so the camera does not get confused about what to focus on.
If you have a more modern camera (made after 2017) then you may have an eye autofocus setting which makes things easier for bird photography. We’ll look at that later on in the article also. If you want to skip right to that section, click here.
If you have an older model DSLR like the Nikon D5200, you will have the choice of Single-point AF or Dynamic-area AF with a choice of 9, 21, or 39 AF points. There are also the options of 3D-tracking and Auto-area AF but I do not suggest using these for bird photography.
Birdwatch World Suggested Settings For Focus Points
Here at Birdwatch World, all of my bird photography is done using a Nikon D5200 and an AF-S Nikkor 70-300mm f/4.5-4.6 G ED lens.

The focus point setting I use pretty much all the time is 9-point dynamic-area AF. The only time I will change this is if I am photographing birds flying against a blue sky, in which case I use 39-point dynamic-area AF.
There are times when single-point AF is helpful, such as when a bird is perched, sitting down, or standing still. In these cases, you can place the focus point over the bird’s eye and you should get a nice sharp focus.
This does depend on the size of the bird and its eye. It may be too small of a target for your camera’s autofocus system.
9-Point Dynamic-area AF Advantages
9-point dynamic-area AF works well for both stationary birds and those that are moving or flying in front of “busy” backgrounds.
A “busy” background is something with a lot of contrast and color difference, such as trees, bushes, dirt, grass, etc. It is easy for your camera to lose focus on a bird that is moving across terrain like this. This also applies to cloudy skies where I find the autofocus of the Nikon D5200 will struggle a tiny bit.


You can also have success with 9-point dynamic-area AF when birds are still.
Where To Focus On The Birds
With bird photography or any sort of wildlife photography for that matter, it is crucial to get the eye of the animal in focus.
I do not place the focus point on the eye of the bird very often when using single-point AF. With most birds, the eye is a very small target.
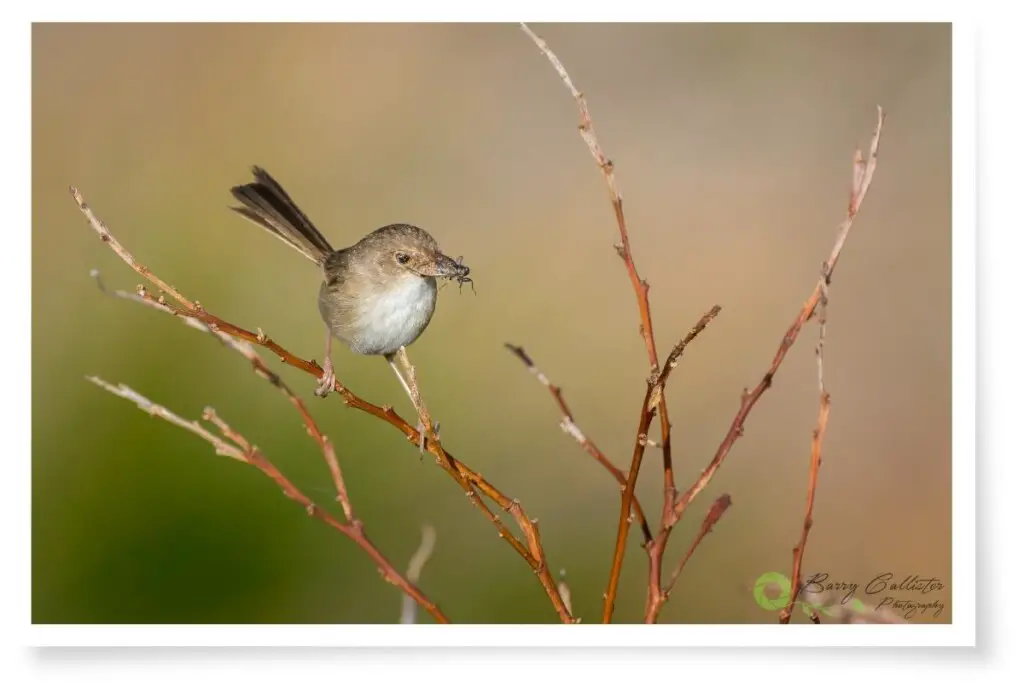
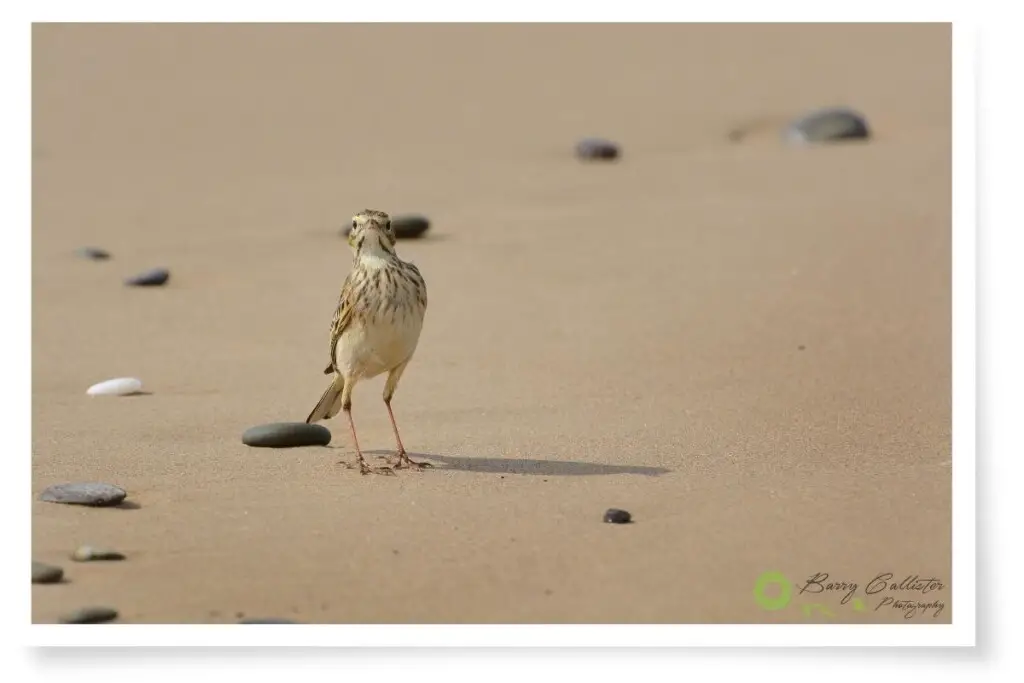
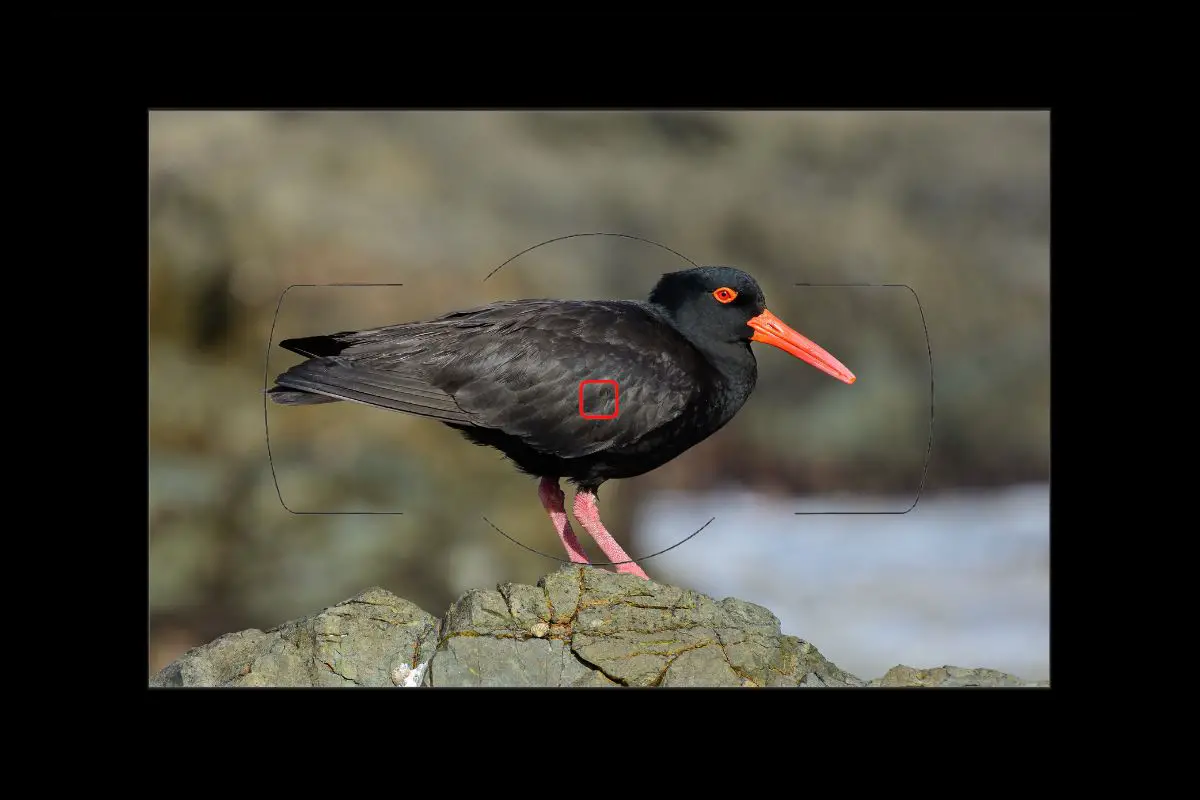
What I do instead is place the focus point on their chest or the side of their wing if they are side-on. I also do this when using 9-point dynamic-area AF.
In the image above, I used 9-point AF and placed the center point roughly over the bird’s chest. As the chest of the bird and its eye are basically in the same vertical plane, I managed to get both in focus.
As some of the focus points are outside of the bird’s body, you may get some shots that aren’t focused. I find this doesn’t happen very much and is not a major problem.
With bird photography, it is always a good idea to get the whole bird in focus too, not just the eye. By using this technique, we can be confident that the entire bird will be in focus as we have used an aperture (f/10 in this case) that gives us enough depth of field to give that result.

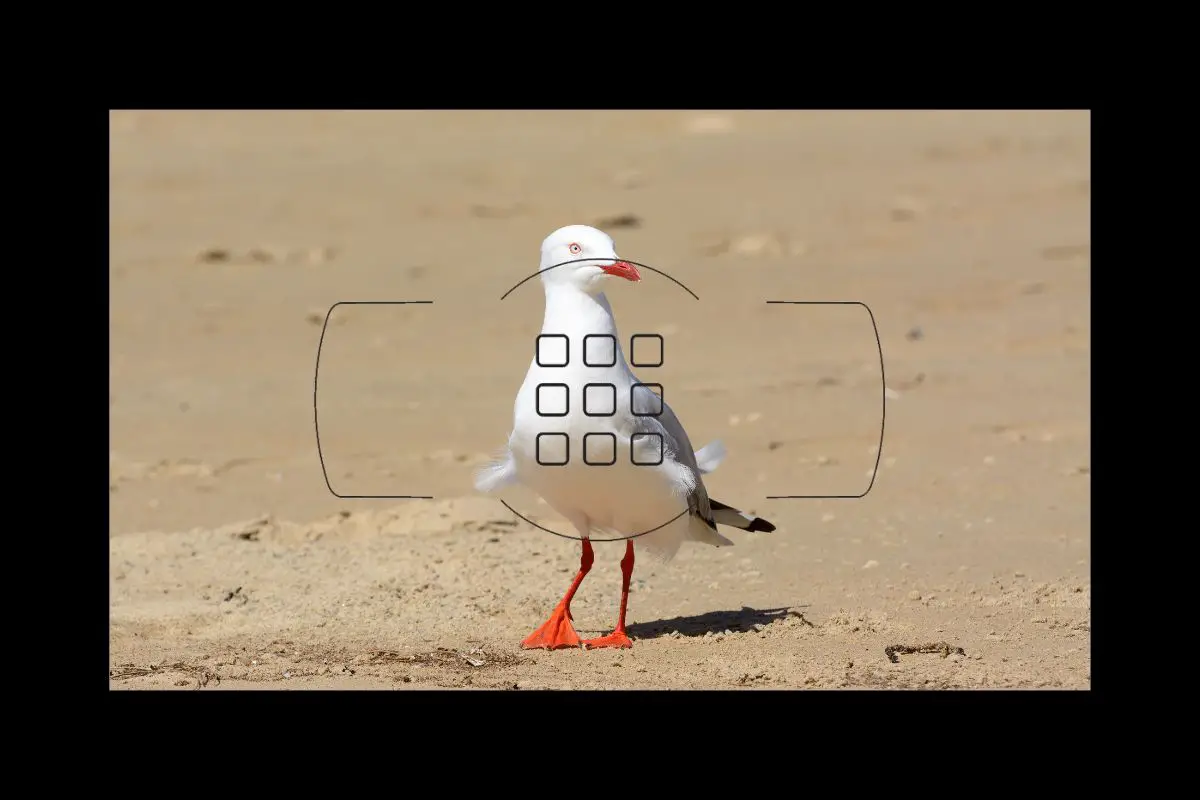
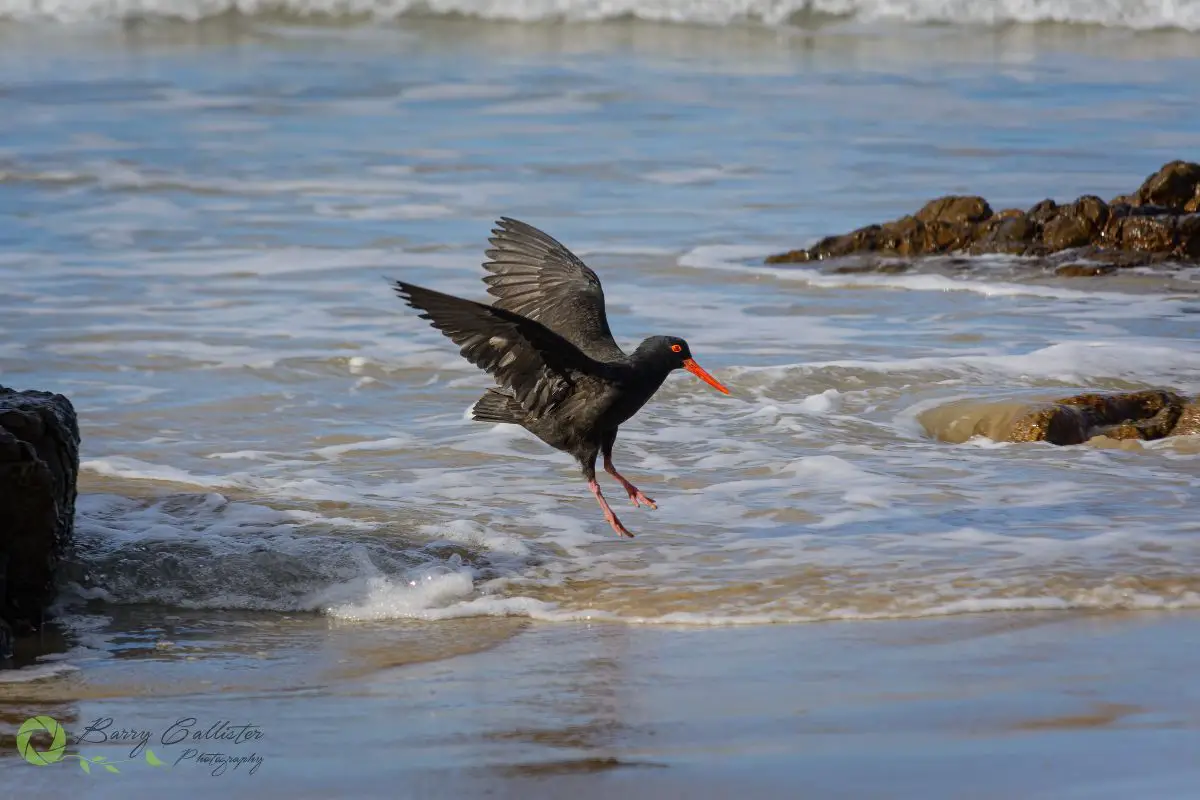
I have done the same thing in the above image. My focus points were on the bird’s wing. In this case, the wing and the eye are not in the same vertical plane but my aperture overcomes that problem and provides enough depth of field.
If I was to focus on the eye only in this case, my camera may easily miss focus and assume I was trying to focus on the sand in the background.
Your camera doesn’t know what you’re trying to photograph. It can’t tell a bird from sand or rock or anything else.
How Single Point AF Can Let You Down
The next picture shows how using single-point AF can fail.
In this case, I had the focus point on the bird’s eye and then it moved. As I’m using old equipment that doesn’t have eye-tracking, the camera has focused on the rocks behind the bird instead of its eye.
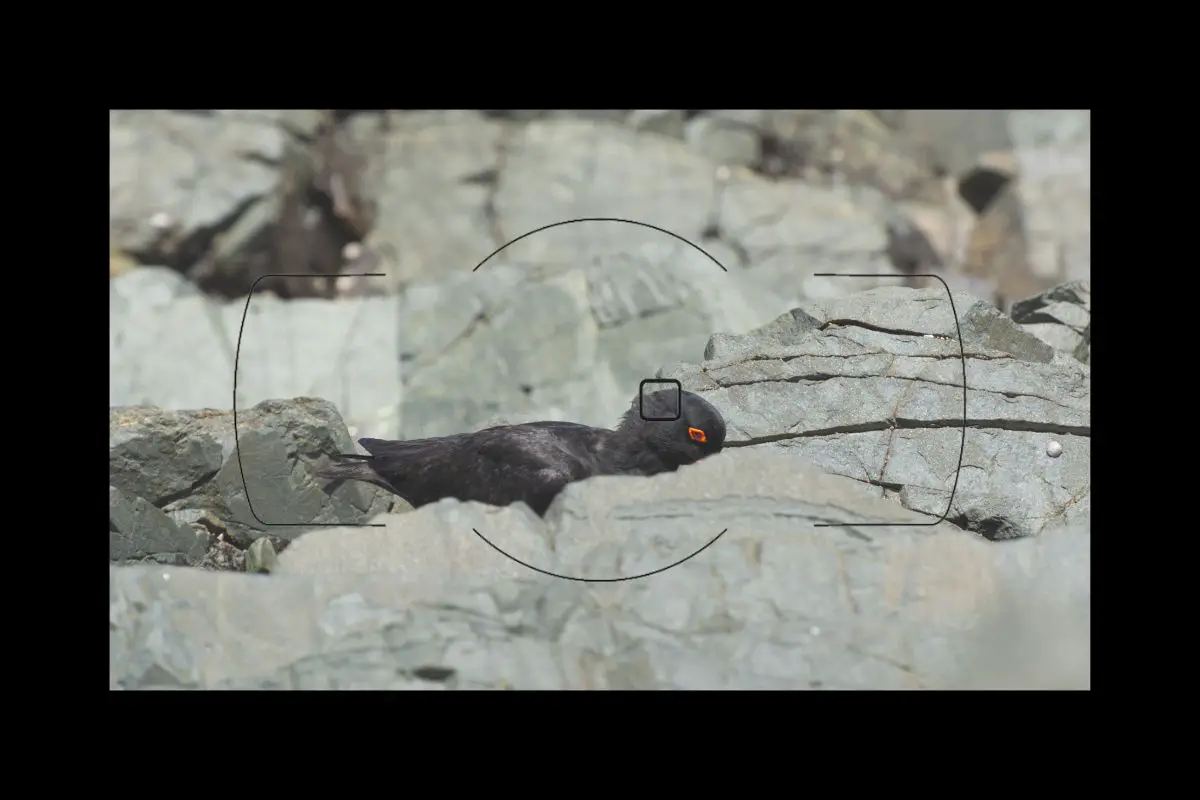
If you are using an older camera body such as the Nikon D5200, you will miss focus on a few shots in cases like the one above.
When I took that photo, I had a bird with rocks in front and behind, and it was also foraging for food so it wasn’t remaining still. Older focus systems will just not track well in situations like that.
When To Use 39-Point Dynamic-area AF
39-point dynamic-area AF (or more if your camera has it) is ideal for birds flying in a clear blue sky as the bird is the only difference in contrast in the frame at that time.
Your camera should do well focusing on birds in the clear blue sky if you choose higher focus point numbers.

When taking the image of the Square-tailed Kite above, I used 39-point dynamic-area AF. You can see how in a clear blue sky, the bird is the only thing in the frame that the camera can focus on. No matter where that bird flies, as long as it is under one of those 39 AF points, the camera will focus on it.
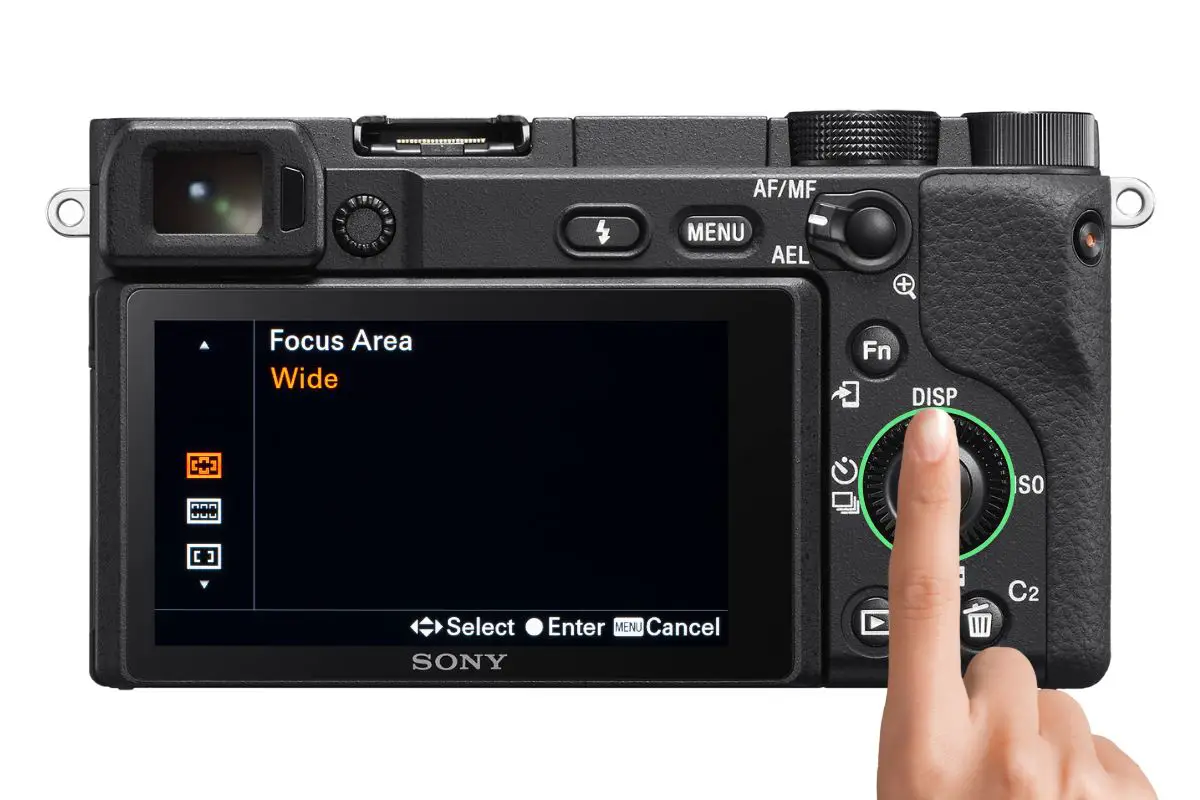
Using Eye Autofocus
If you are lucky enough to have a camera with eye autofocus technology, then that is something you want to use for bird photography.
Eye autofocus will find and track the eye of an animal, making sure that it’s always in focus. (It makes everything just a little too easy if you ask me!)
My Sony a6400 has eye AF and also allows you to set it for humans or animals. I’ll quickly run through the settings I suggest for eye AF on the a6400.
Step 1
Make sure your camera is turned on and press the Menu button.
Step 2
Using the Control Wheel, navigate to the Camera Settings 1 tab.
Step 3
Using the control wheel again, navigate to page 6/14, AF2.
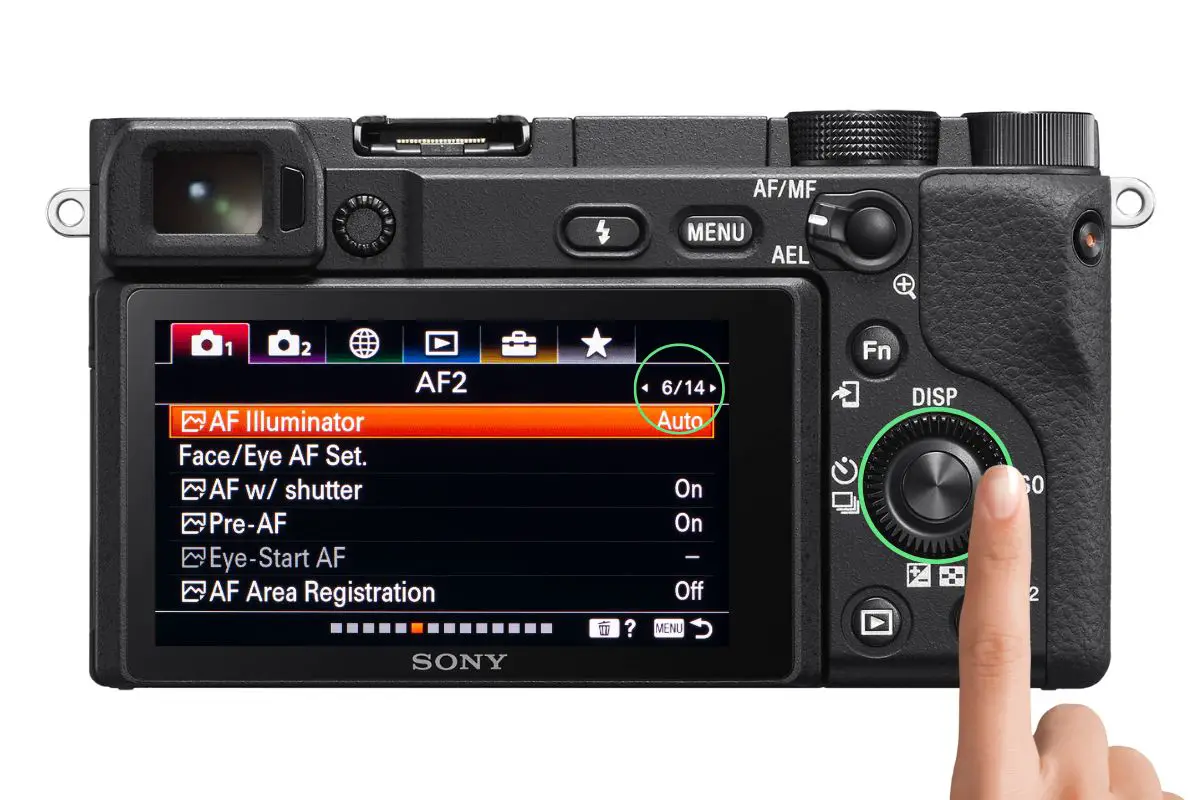
Step 4
Use the control wheel to navigate down and illuminate Face/Eye AF Set. Then press the center button to enter that menu.
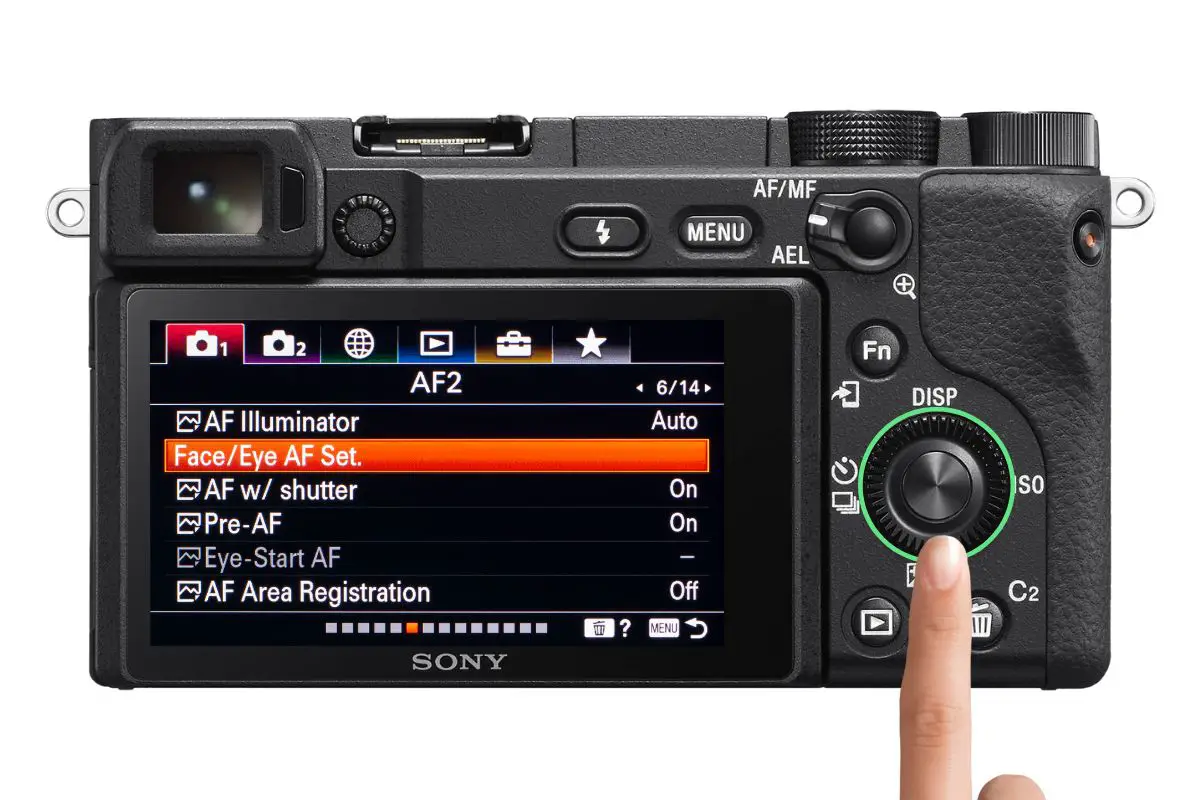
Step 5
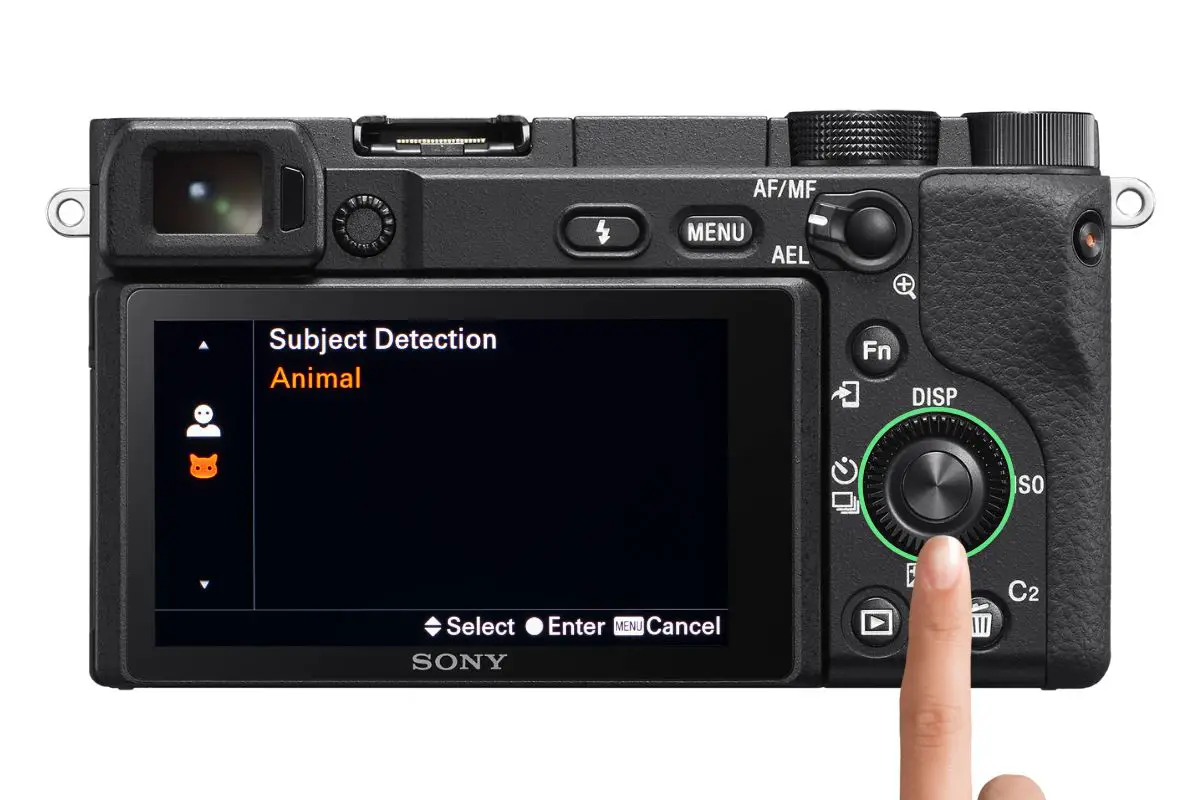
Use the control wheel again to navigate down to the second item on the menu, Subject Detection. Press the center button to enter that menu.

Step 6
Use the control wheel to select Animal and press the center button to turn it on.
Step 7
Press the menu button again to go back to the menu pages.
Step 8
Use the control wheel to navigate back to page 5/14, AF 1.
Step 9
Using the control wheel, navigate down to the 4th term on the list, Focus Area. Press the center button to enter that menu.
Step 10
Using the control wheel, navigate to the top of the selections until Wide is illuminated. Press the center button to select it. This will use the widest area of focus points and allow the camera to find the bird’s eye no matter where it is in the frame.
Back-button Autofocus
NOW things start to get really interesting?!

When your camera is set to its default setting, the shutter button is what will trigger your autofocus. You press the shutter button down halfway to focus and then all the way down to take a shot.
This method of focusing, however, has its drawbacks.
Firstly, if you are photographing a bird that is perched on a rock you might have chosen to use Single-servo AF (one-shot AF on Canon cameras).
In that mode, your camera will achieve focus and then lock it in, it will not constantly try to focus as it will in continuous autofocus mode.
You press the shutter button down halfway, get the bird nicely in focus, and then…it chooses to fly off!
What you have to do now is either attempt to photograph a moving subject with Single-servo AF (try it, it’s not fun!) or quickly change to AF-C. By the time you make that focus mode change however the bird is most likely nowhere to be seen.

The second problem with Single-servo AF is the possibility of your finger slipping off the shutter button or simply lifting above that half-press point. Either of these things is easy to do and means that you have to try to achieve focus again by which point the bird may well have flown off again.
This is where back-button autofocus can save the day.
Back-button Autofocus Nikon
Watch the video below from Photographer’s Freedom on YouTube to learn more about how to set up and use back-button autofocus on the Nikon D5200:
Back-Button Autofocus Sony
If you are a Sony a6000 series user, this video tutorial from Michael The Maven is fantastic. Not only does he explain easily how to set up back-button focus on the a6400 but he also goes through every menu item in the entire camera?!
The Advantages Of Back-button Autofocus
Think of back-button autofocus as two focus modes in one. Not only can you use it like single-servo AF but you can also use it as continuous autofocus. Let me explain…
Once you have set your camera to continuous autofocus, chosen your focus points, and set up back-button autofocus, all the focusing you do is then controlled by the button you chose on the back of your camera.
If you want to focus once and lock focus, all you do is press that button, hold it until focus is achieved, and then take your finger off the button. The camera will not lose focus like it would in single-servo AF. You can focus, recompose your shot if that’s what you’re doing and be confident you won’t lose focus.
If the bird decides to fly off, you’re ready to handle that! You’re already in continuous autofocus. All you have to do is press and hold that back button and your camera will continually focus on whatever is within the focus points you chose.
Now I am making this back-button focus thing sound really simple and amazing. It is amazing but it does take some getting used to. If you have been focusing using the shutter button for years, doing it from a button on the back of your camera is going to feel a little strange to you for a while.
Stick with it. It is the best focusing technique I have discovered for bird photography or any wildlife photography for that matter. I don’t think I could ever go back to shutter button focusing.
References
- Stunning Digital Photography – Tony Northrup
- The Secrets To The Nikon Autofocus System – Steve Perry